Quantcast
Channel: Zmodo Knowledge Base - Latest FAQs
Viewing all 208 articles
Browse latest View live

How Far Can I Run My PoE Cameras?

$
0
0

The distance that a PoE camera can be ran is dependent on the quality of ethernet cable used.  The included cables for the PoE kit are 60ft long.  Please follow the recommendations below if you need to run them further.  

CAT5 cable can be used to run the PoE camera up to 200ft.

CAT6 cable can be used to run the PoE camera up to 300ft.  

At this time, there is no solution to run the cameras further than 300ft.  


Adjusting camera layout

$
0
0


If the camera layout on your display is not in an order that you like, you can switch the cameras to specific channels. For example, you'd like the video from channel 1 switched with the video from channel 3. 


Open the main menu and select "DEVICE MANAGEMENT"


Next, from the list on the left, click on "ADD DEVICE"

(this is usually the default when you open the device management menu)

Here you can copy down the IP addresses and see which channels thay are currently connected to. Select the camera you wish to change using the box under "channel" and delete the cameras as needed. You can then select "ADD DEVICE MANUALLY"

You can enter the IP address of the camera you wish to add in the order that you want them to be listed. Although you can not directly select which channel the camera will connect to, the system will order them starting with channel 1.

How to Repair The Cable on a Simplified POE Camera

$
0
0

**Warning** Cutting the end off of a camera or cable will VOID the warranty on that item. **Warning**


 **if your cable end is defective, or has corrosion, this may be covered under warranty, create your warranty online at http://www.zmodo.com/rma or contact our support department**

The cable pinout on the Simplified POE camera is different from the stanrard LAN cable because only four out of the eight cables within the LAN cable are actually used.


If the cable on the camera is damaged and needs to be replaced, please use the diagrams above to model how to reinstall the cables into the pin positions.

Pins 1 and 6 are power, pin 1 is negative and pin 6 is positive. Pins 2 and 3 transmit data to and from the camera.


**Please do not use this diagram to create a pinout for a separate power source for the Simplified POE cameras.  The cameras use a proprietary data communication protocol, therefore the only way to power on the camera is to directly connect it to one of the back ports on the the Simplified POE NVR.


Troubleshooting Camera Connection to the Simplified POE NVR

$
0
0

In the event that the Simplified POE Cameras (SKU ZP-IBT15-S or ZP-IBH15-S) are not showing any video when connected to the Simplified POE NVR (SKU ZP-NE14-S) please complete the following steps:


1. Make sure that your router is securely connected to the NET port on the NVR (ZP-NE14-S) using an ethernet cable.  The NVR will be unable to locate the any cameras that are connected to it unless the NVR is also connected to a router.


2. Make sure all cameras are securely connected to the PORTS input on the back of the NVR using either ethernet cables or the simplified ethernet cables that came included with the Simplified POE kit.


3. If the cameras are still not appearing on the screen, press and hold the reset button on the back of the NVR for 30 seconds while the NVR is turned on.  This will set the camera input to default settings, and the NVR will automatically search for SPOE cameras that are connected to the back of the NVR.

Setting Up Wireless for NVR IP Cameras

$
0
0


Before you begin you will need:

  • Camera MUST be WIRED directly to your router and powered on
  • Router IP address range
  • Gateway address (this is your router's IP address)


>You will need to install the IPC Search software located here:

http://files.zmodo.com/Software%20Files/NVR%20Tools/IPCSearch1.0.15_Setup.exe


Once installed:

>Click "refresh" to find wireless devices.


Next, move the mouse to the device you want to set up and right click. You will see two options, left click on "Networking".

IPC search net opt


A new window will open as shown below (notice the two tabs, Networking and WiFi). First, uncheck the DHCP option at the top. Next, enter the IP address and gateway as needed to work with your router.  After you enter the information on the "Networking" tab click save and close the window. Right click on the device and select "Networking" to repeat this process for the "WiFi tab".

IPC search tool


You will want to open the camera in an Internet Explorer browser. Example, if the IP address you gave the camera was 192.168.1.50, then you will type http://192.168.1.50 in the browser's address bar and then hit enter. Once you get to the login screen, be sure to enable compatibility view in the browser settings (In IE, tools>compatibility view). You will need to login with your username and password.

Default username: admin    Password: 111111


Click on the gear(settings) the go to the Network section and make sure you uncheck DHCP and save the settings. You then want to click on Wireless Settings. You may need to fill in the proper IP address information to match the settings you entered earlier. You will then double click on the wireless router that should have come up in the list below. You will enter your wireless password and choose connect. It should say succeed and then you will choose save. After both options succeed you can close out of that configuration box.

****WEP is not an acceptable security key option and the camera will not accept any WiFi network with this type of security encryption. You must use WPA/WPA2.


Reset Zsight Account Password

$
0
0


If you are unable to login to the original account because you forgot the password, you can reset that password through Zsight.  On the login screen, choose the bottom option “Forgot Password?” and then input the email address for that Zsight account.


Then you should receive an automated email from meshare@meshare.com with a link to reset that password.  If you don't see the email, check your spam folder.  Also, if this link does not open properly in 

Change Device's Zsight Account

$
0
0


   If you have accidentally scanned the QR code device onto the wrong Zsight account, or you are wanting to change the account to which the device is associated, you will need to delete the device from the first account.  To do that you will login to Zsight under the account to which that device is currently associated.  Then while on the List page, press and hold on the device you are wanting to remove and you should see a prompt show up to “Delete Device.” 

 android delete device  iOS delete device

Then once you have deleted that device from the original account, you should now be able to add that device to any other account you would like.


**FYI: If the device that you deleted was being shared to other accounts, you would need to redo the sharing process from within the new account to which the device is associated.**


See link to Sharing Zsight Devices:

 http://kb.zmodo.com/index.php?action=artikel&cat=1&id=356&artlang=en


Otherwise, if you are unable to login to the original account because you forgot the password, you can reset that password through Zsight.  On the login screen, choose the bottom option “Forgot Password?” and then input the email address for that Zsight account.  Then you should receive an automated email from meshare@meshare.com with a link to reset that password.  If you don't see the email, check your spam folder.  Also, if this link does not open properly in mobile browser, then try opening the link from a PC browser and it should work for you.


See link to Password Reset:

 http://kb.zmodo.com/index.php?solution_id=1358


Viewing/Sharing Device on Multiple Zsight Accounts

$
0
0

If you want to view your QR Code device (IP camera, DVR, NVR) on multiple devices (iOS or Android) using the same Zsight account, you will just download the Zsight app and login using the same email address and password you created on the first device. However, if you want to view the device on multiple devices (iOS or Android) each with a separate Zsight account, you will need to share that device to those other accounts. 

 Open the Zsight app, tap on the device in the list that you want to share, click on the gear icon on the top right hand side. And then follow the steps shown below for both iPhone and Android, respectively:


Android share1   iOS share1


Android share2  iOS share2


Android share3  iOS


Then you will put in the email address of the account to which you would like to share that device.  

- If they do not have a Zsight account with that email, they will receive an automated email with a link to create the account online.  Or they can sign up within the Zsight app itself.  

-If they already had a Zsight account created using that email address, they just need to login to their account.  

Once logged into that account (new or existing), they will see a prompt in the Device List notifying that the device is being shared.  And just click on “Watch Now” or “Accept” and you should now have access to that shared device on the other account.


android share4  iOS share 4


Otherwise, if you try to manually adding the device to the second account by either scanning the QR code or searching the LAN, you will get an error message saying the device was already bound to a previous account.


Setting the date and time on my P2P system

$
0
0


From the main menu select "General Settings". On the left side, select "Date & Language"

P2P date and time


The "System Time" must be set in using a 24 hour clock.

For AM you would use numbers from 1-12 for the hour and for PM you would use 13-23.


The "time format" setting that allows you to select between the 12 and 24 hour clock only refers to the on screen display. 

You can also set the date and select the display format. You can choose to have the display set in different formats as month/day/year or day/month/year.

Why Doesn't the Video Appear When I Connect to an HDMI Monitor?

$
0
0

The first generation of Peer-to-Peer DVR units and NVR units were only compatible with HDMI TVs that support 50Hz variables.

HDMI TVs will support either 50Hz, 60Hz, or both variables.  The Hz specification on an HDMI TV indicates the unit is frequency in which the device (DVR or NVR) communicates a video signal to the TV.

If you connect your DVR or NVR to an HDMI TV and you do not see any video signal on your HDMI TV, then most likely the issue is that you are using one of the devices that only supports 50Hz HDMI TVs and your HDMI TV only supports 60Hz.


A resolution for this is to use a VGA cable to connect your DVR or NVR to your TV.  All DVRs and NVRs support VGA video.  Additionally, the only devices that are not compatible with 60Hz HDMI TVs are video resolution 720P or lower.  Therefore, the video resolution on on these devices will look exactly the same regardless of whether they are connected using HDMI or VGA.

Wireless Kit NVR Password Reset

$
0
0

If you are unable to login to the white NVR box from the wireless kits (ZMD-NV-SBN4 or ZP-NB14), first trying using the defaults:

Username: admin (all lowercase)

Password: 111111

If the defaults are not working, you can restore the password to factory defaults by removing the top case of the NVR and jumping the two pins on the motherboard as shown below.

To do this, you only need to use a flathead screwdriver or metal paper clip to connect the two pins together.  Make sure the metal of the screwdriver or paper clip connects both pins to reset the password.  After around 20-30 seconds the NVR should automatically reboot and now be at the default username and password.

Complete User Manual for the DT-SAN4 and DX-SAN8

Lower Resolution for ZMD-DX-SAN8, ZMD-DX-SIN8, and DS-H81A (Firmware V70.1.2.3)

$
0
0

First, if the DVR was working at the default resolution (1280x720) and it was manually set too high, hold the reset button on the back of the DVR for 30 seconds to bring it back to default resolution (1280x720).

***WARNING: This will reset all the other settings back to default as well.***


Walkthrough to Lower Resolution for ZMD-DX-SAN8, ZMD-DX-SIN8, and DS-H81A (Firmware V70.1.2.3)


Power off DVR, wait 5 seconds

Power DVR back on

Wait until loading screen goes away

Wait another 5 seconds for it to finish loading.


For the ZMD-DX-SAN8 or DS-H81A, you will use Zsight app remote control option.

Zsight Remote Instructions: http://kb.zmodo.com/index.php?solution_id=1329


For the ZMD-DX-SIN8, you can use the buttons on the front panel of the DVR.


Press the following buttons in order:

Menu

OK x 7

Esc

Down

Ok

*****************************************************************************
(only do these steps if DVR was Reset or first time hooking up and the Start-up Guide hasn't been disabled)

Esc x 2

Menu

Down

OK

*****************************************************************************

Ok

Down x 5

Ok

Right

Down

Ok

Up (Once for 800x600, 2 times for 1024x768)

Ok

Down x 2

Ok

Up

OK x 7

Esc

Down

Ok


DVR will reboot with the lower resolution you've selected.

Lower Resolution for ZP-NE14-S

$
0
0

First, if the NVR was working at the default resolution (1280x1024) and it was manually set to a non-working resolution, hold the reset button on the back of the DVR for 30 seconds to bring it back to default resolution (1280x1024).

***WARNING: Reset button will reset all the other settings back to default as well.***


Walkthrough to Lower Resolution for ZP-NE14-S (V40.0.2.14)


Power off NVR, wait 10 seconds

Power NVR back on

Wait until loading screen goes away

Wait another 10 seconds for it to finish loading.


Using Zsight app remote control option (make sure phone is on same WIFI as the NVR)

Zsight Remote Instructions: http://kb.zmodo.com/index.php?solution_id=1329


Press the following buttons in order:

Menu

OK x 7

Esc

Down

Ok

****************************************************************************************************************
(only do these steps if NVR was Reset or first time hooking up and the Start-up Guide hasn't been disabled)

Esc x 2

Menu

Down

OK

*****************************************************************************************************************

Ok

Down x 5

Ok

Right

Up x 2

Ok x 2

Down

Ok

Up

OK x 7

Esc

Down

Ok


NVR should then reboot with the lower resolution (1024x768)

How To Connect a Device Online Using Peer-to-Peer (P2P) Connection on a Mobile Phone

$
0
0

Zmodo devices that have a QR code printed on the label support online viewing using our P2P server.  A QR code looks like this:


All Zmodo products that have a QR code can be setup on the internet using the Peer-to-Peer (P2P) method.  You can setup your device online using the P2P method using an Android or iPhone smartphone or tablet.


Alternative Mobile Application - Third Party Mobile App for Android and iPhone/iPad

$
0
0
IP Cam Viewer Basic and IP Cam Viewer Lite - A Free 3rd Party App
 
   If you are having trouble viewing your cameras with the mobile app Zsight or the MeShare app, or if you had to do port forwarding to enable remote viewing of you cameras, we recommend using a third party app called IP Cam Viewer. This app is available for both Android and Apple mobile devices, and is fully compatible with all Zmodo and FunLux equipment.
 
  There are a few different versions of IP Cam Viewer that will show up when you do a search in Google Play or iTunes Store. There are two free versions that we recommend: "IP Cam Viewer Basic" and "IP Cam Viewer Lite". Both apps work equally well and there are no known differences between the two apps.
 
  There is also a paid version of IP Cam Viewer called "IP Cam Viewer Pro". The only difference between the paid and the free apps is that the free apps will not allow you to add more than 6 cameras to the app. Other than this camera limitation the paid and the free apps are identical.
 
  Once you have installed the app, here is what you need to do to be able to see your cameras with the app, If you are using any Zmodo or Funlux IP cameras, you will enter the following settings:
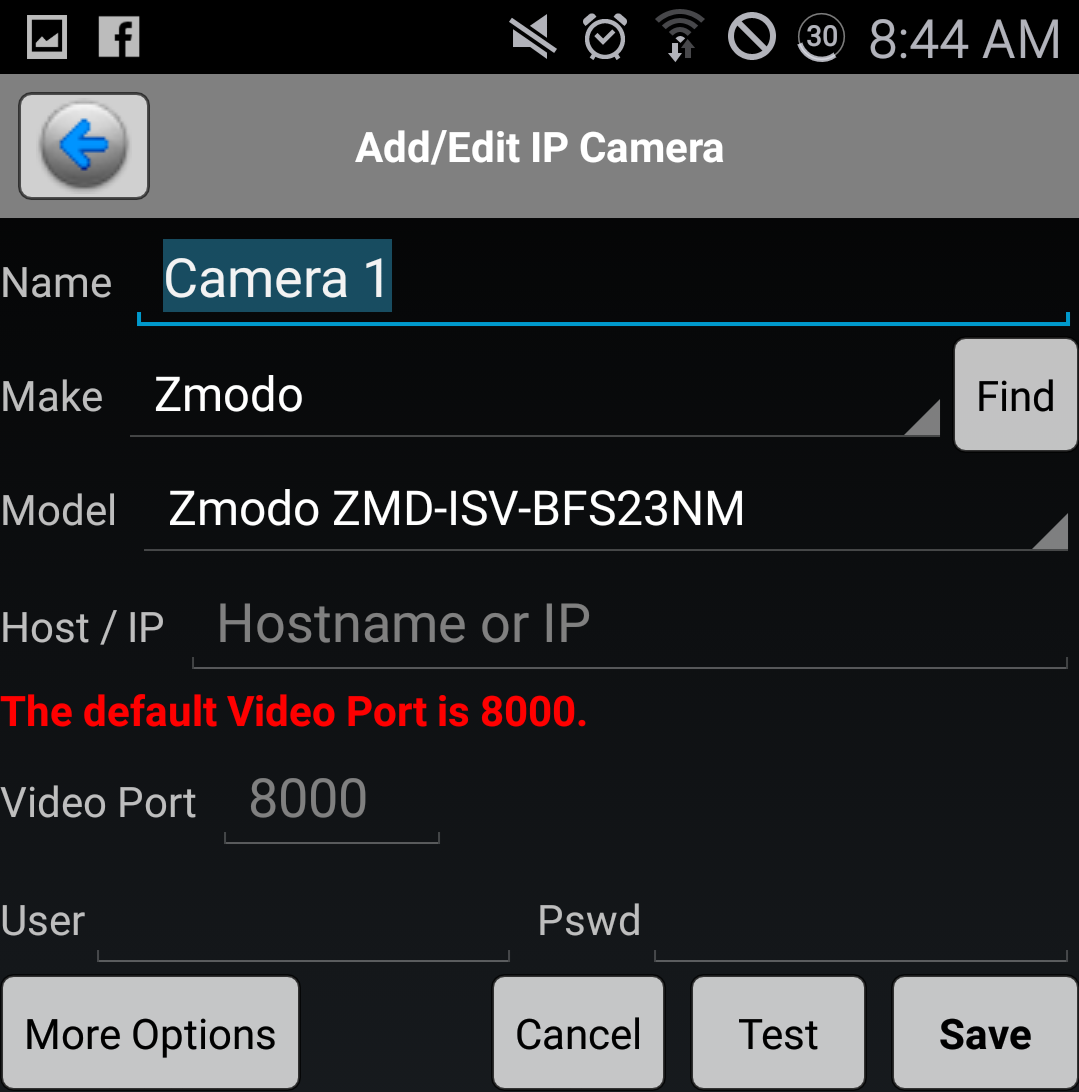
1.  "Name" - you can enter whatever you like. This will appear on the device list when you want to open that device.
2. "Make" - select Zmodo.
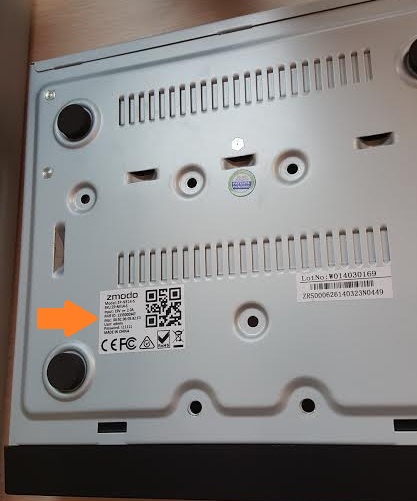
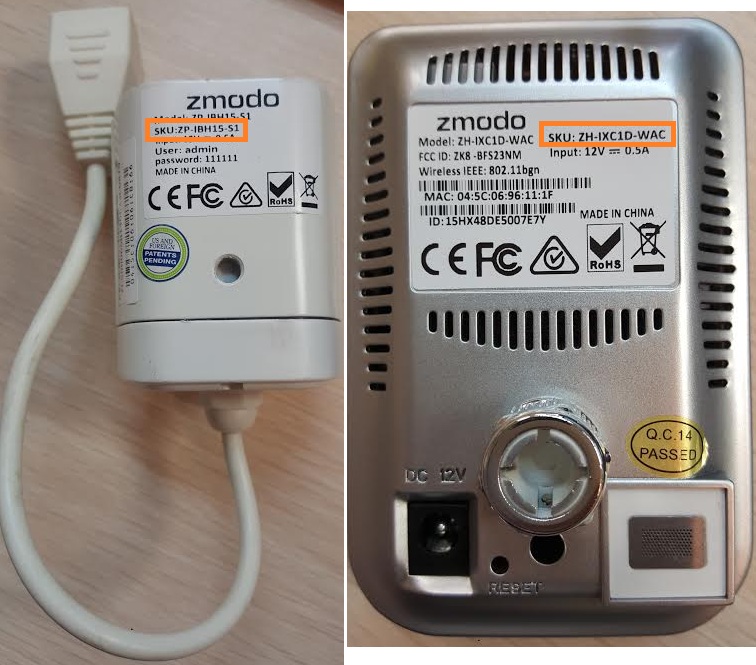
3. "Model" - Select the option that matches the SKU on the white sticker on your device. If you are setting up a DVR/NVR, use the SKU from the bottom of the system. If you are setting up a single camera, use the SKU from the camera. ***If your specific SKU is not listed, you will need to select ZMD-DX-SAN8 for an analog DVR system, ZMD-ISV-BFS23NM for an IP camera, and ZP-NE14-S for a sPOE system*** After selecting the model, tap "back".
4. "IP/Host" - enter your IP address or hostname here
5. "Video port" - This should be either 8000 or 9000 and should prefill automatically based on the model number.
6. "User" - enter the user name for your device. *Note this is case sensitive and should match your device.
7. "Pass" - enter your device's password here. Most devices use a default of 111111.
8. "Ch. #" - select a channel number for your device. For an IP camera, you will enter channel 1, for a DVR/NVR you will enter 1, then 2 for the next device as each camera is programmed seperately.
 
Once you have all the information entered, you can test the connection. *Be sure if you are using your WAN IP address that your WiFi is turned off and if you are using a LAN IP address that your Wifi is turned on.
.
Please note that these instructions assume you have already completed port forwarding or have otherwise already enabled your camera(s) to be viewed remotely. These instructions only explain how to navigate the IP Cam Viewer app. For a comprehensive step-by-step guide on how to do port forwarding, visit our interactive networking guide here: http://kb.zmodo.com/NetworkTutorial/landingpage.html 


For additional resources with port forwarding, please contact your router manufacturer or internet service provider. 
 

Routers, IP address & support contact #

Apple      10.0.1.1          800-692-7753

Asus        192.168.1.1     877-339-2787

Belkin     192.168.2.1     800-223-5546

Buffalo    192.168.11.1   866-752-6210

D-Link     192.168.0.1    888-909-4786

Linksys     192.168.0.1    800-326-7114

Motorola   192.168.10.1   866-289-6686

Netgear     192.168.0.1    888-638-4327

Trendnet   192.168.0.1    866-845-3673

TP-Link    192.168.1.1    866-225-8139


Internet Service Providers (ISP) & support contact #

Comcast             800-934-6489

AT&T               800-288-2020

Verizon              800-837-4966

WOW                866-496-9669

MediaCom          844-274-6753

Time Warner       888-715-3291

Optimum          CN:203-870-2583 NJ:973-230-6046 LI:631-393-0636

CenturyLink        866-642-0444

Charter                888-438-2427

Cox                     877-832-7658

Frontier                877-600-1511

Wind Stream         866-445-5880

My Camera Talked at Me! How to Setup a Camera using Smartlink

$
0
0

New Zmodo wireless cameras support a method of connection called "Smartlink."  If your camera played a voice message that said "Ready for Smartlink" the first time that you turned on the camera, then you will use the Smartlink method to connect your camera to your router's WiFi connection.

https://www.youtube.com/watch?v=71HtTzvaqgc


1. First, download the free ZSight mobile app and create a ZSight login using a valid email account.

2. Next, make sure that your Smartphone is connected to the same password-protected wireless connection that you intend to connect your camera to.

3. Login to your ZSight account on the ZSight mobile app and tap the + icon on the upper-right corner of the app screen.

     **If you are connecting more than one camera, make sure to only setup one camera at a time to avoid a network connection conflict.


4. Select "Smartlink" from the list that appears when you tap the + icon. 

5. Follow along with the on-screen instructions on the app, and enter the wireless password to your router when prompted, then tap "Next."

6. The camera will attempt to connect to your wireless router.  If the WiFi connection is successful, the camera will play a voice recording that says "Successfully Connected."

   **If the app states that the wireless connection timed out, force-close the ZSight app then re-open the Zsight app.  Then, tap the + icon and select "Search LAN."  Your camera may appear in the LAN list and you can select to add your camera by LAN.  If your camera does not appear in the LAN list, go back and try to add by Smartlink again.


7. When prompted, name the camera. You can name the camera anything that you want, but it is necessary to name the camera.

8. When the camera is successfully named, you will be directed back to the Device List in the ZSight app.  Tap the icon on the Device List that represents your camera (according to the name that you just named your camera) and you will be able to view your camera's live video and adjust your camera settings.


How to Connect Wireless IP Cameras to a Simplified Power Over Ethernet (SPOE) System

$
0
0

If you need to connect any number of Wireless IP cameras to your Zmodo NVR, please follow along with the steps in this video:


How to Locate the SKU Number on Your Device

$
0
0

Zmodo DVRs, NVRs, Cameras, and Accessories use a SKU number instead of a Model Number.  If you contact technical support or request a warranty repair, you will be asked to provide the SKU number of your device.


You will first need to locate the Zmodo information sticker on your device as shown below:


The SKU number will be labeled on this sticker as the SKU Number.  If your sticker lists both an "Old SKU" and a "New SKU" then the New SKU is the number that you will need to provide.  If the sticker has an "Old SKU" you can simply ignore this number.


How to Backup a Video Clip from a DVR or NVR with July 2015 Software (New Video Backup Method)

$
0
0

DVRs and NVRs with software from July 2015 have a new method of backing up and saving video files.

Please refer to the below video for steps on how to create a clip and backup a video file clip:


Viewing all 208 articles
Browse latest View live


Latest Images