Quantcast
Channel: Zmodo Knowledge Base - Latest FAQs
Viewing all 208 articles
Browse latest View live

How to Convert Video Files from H.264 to .AVI for the ZMD-DT-SFN6

$
0
0

To convert individual video files to .AVI format, you will need to download the program called NetDVR.

NetDVR can be downloaded from the site below;

https://dl.dropbox.com/u/72446397/NetDvr.msi


You will need to run NetDvr and click Offline

 NetDVR1


To view your files using a standard media player, you will need to convert the file from the .264 format to .avi format.

  1. Click on the H.264 to AVI button


     NetDVR2

  2. Browse to your source file in the SrcFile field.
  3. Select you Destination file path in the DestFile field.
  4. Click the h264toavi button to convert the selected video file to .AVI format.

Recommended Mobile Phone Apps for the ZMD-DT-SFN6

$
0
0

MOBILE Applications to use for the ZMD-DT-SFN6 DVR :


     Android phone:
ESeenet or Meye. Both are available for free download from the Android Play Store

     iPhone:

TMEye+. This app is available for free from the App Store


Email Alert Settings

$
0
0


Email Alert Settings

Gmail Email Alert Settings

**Before using your Gmail account as your SMTP server, be sure that you have enabled Gmail POP3 or Gmail IMAP through settings in your Gmail Account.**

SSL : Enable

SMTP Server : smtp.gmail.com

SMTP Port : 465 or 587

Sender : "your gmail email address" (ex. johndoe@gmail.com)

Password : "your gmail password"

Reciever : "your email address" (ex. johndoe@gmail.com)


Yahoo Email Alert Settings

**Before using your Yahoo! Mail account as your SMTP server, be sure that you have enabled Web&POP Access in your Yahoo! Mail Account(go to Options>Pop&Forwarding)**

SSL : Enable

SMTP Server : smtp.mail.yahoo.com

SMTP Port : 465 or 587

Sender : "your yahoo email address" (ex. johndoe@yahoo.com)

Password : "your yahoo password"

Reciever : "your email address" (ex. johndoe@yahoo.com)


Hotmail/MSN Email Alert Settings

SSL : Enable

SMTP Server : smtp.live.com

SMTP Port : 25

Sender : "your hotmail email address" (ex. johndoe@hotmail.com or

johndoe@live.com )

Password : "your hotmail password"

Reciever : "your email address" (ex. johndoe@hotmail.com or johndoe@live.com)


AOL Email Alert Settings

SSL : Enable

SMTP Server : smtp.aol.com

SMTP Port : 587

Sender : "your aol email address" (ex. johndoe@aol.com)

Password : "your aol password"

Reciever : "your email address" (ex. johndoe@aol.com)

Email setup for dvrs

$
0
0


Email Alert Settings

Gmail Email Alert Settings

**Before using your Gmail account as your SMTP server, be sure that you have enabled Gmail POP3 or Gmail IMAP through settings in your Gmail Account.**

SSL : Enable

SMTP Server : smtp.gmail.com

SMTP Port : 465 or 587

Sender : "your gmail email address" (ex. johndoe@gmail.com)

Password : "your gmail password"

Reciever : "your email address" (ex. johndoe@gmail.com)


Yahoo Email Alert Settings

**Before using your Yahoo! Mail account as your SMTP server, be sure that you have enabled Web&POP Access in your Yahoo! Mail Account(go to Options>Pop&Forwarding)**

SSL : Enable

SMTP Server : smtp.mail.yahoo.com

SMTP Port : 465 or 587

Sender : "your yahoo email address" (ex. johndoe@yahoo.com)

Password : "your yahoo password"

Reciever : "your email address" (ex. johndoe@yahoo.com)


Hotmail/MSN Email Alert Settings

SSL : Enable

SMTP Server : smtp.live.com

SMTP Port : 25

Sender : "your hotmail email address" (ex. johndoe@hotmail.com or

johndoe@live.com )

Password : "your hotmail password"

Reciever : "your email address" (ex. johndoe@hotmail.com or johndoe@live.com)


AOL Email Alert Settings

SSL : Enable

SMTP Server : smtp.aol.com

SMTP Port : 587

Sender : "your aol email address" (ex. johndoe@aol.com)

Password : "your aol password"

Reciever : "your email address" (ex. johndoe@aol.com)

How to Setup Zmodo IP Cameras to Record on Motion Detection without an NVR.

$
0
0

The current version of ZViewer for PC Computers does not yet support motion detection recording, so we recommend using the free 3rd party software Genius Vision if you would like to set your Zmodo IP Camera to record when motion is detected.

Genius Vision can be downloaded safely from the manufacturer's website here: http://www.geniusvision.net/community.html

The complete PDF manual for Genius Vision can be downloaded safely from the manufacturer's website here: http://geniusvision.net/snapshot/GVUserManual.pdf


Once Genius Vision has been successfully downloaded and opened, please complete these steps to add an IP Camera to Genius Vision:


1. From the Main Menu, select New Objects > New Channel> Camera Setup.


2. From the Camera Setup tab, select RTSP video source as the Driver.

3. Check the box labeled "Use TCP streaming".

4. In the URL field, enter the camera's RTSP url using this template:

               The RTSP address of the main stream (720p) is:

               rtsp://xxx.xxx.xxx.xxx:10554/tcp/av0_0

               The RTSP address of the sub stream (VGA) is:

               rtsp://xxx.xxx.xxx.xxx:10554/tcp/av0_1

               ("xxx.xxx.xxx.xxx" is the device's IP address as reported by the IPC Search tool.)

5. Enter the correct login and password for the camera into the login fields.


The end result will resemble this image:


Click "Apply" to save this camera to Genuis Vision. You should now see the video stream of your camera in the channel grid.


You can now repeat these steps if you would like to add any additional cameras to Genius Vision.  Genius Vision can easily be setup to record when motion is activated by any of the cameras that are configured on Genius Vision.


PC Zviewer CMS Program

How to Get the Best Resolution and Framerate using the ZMD-DT-SCN8

$
0
0

New versions of the ZMD-DT-SCN8 now require that the user choose either 960H, D1, or HD1 as the channel type.  The maxumim resolution and framerate will be different depending on which Channel Type is selected.


If 960H is selected, the maximum resolution will be 960TVL and the maxumim framerate will be 14FPS.  960H is the default Channel Type, however it is not recommended for cameras with less than 704TVL because the maximum framerate is lowered with no benefit to the resolution.

If D1 is selected, the maximum resolution will be 704TVL and the maxumim framerate will be 30FPS.  The most advanced Zmodo analog cameras currently have 700TVL, so the D1 Channel Type is recommended if you are using Zmodo cameras.


To correctly set the recording type, first go to Main Menu > Switch > Channel Type.  Next, select either 960H or D1 and click OK.

Next, set the corresponding recording type for each camera. Go to Main Menu > Record. Set the resolution to the same setting (Either 960H or D1) that you selected in the Channel Type menu.  Click "Application" to save, and the process ir complete.


SAN4, SAN8, SBN4, SNB8, and SBN6 Firmware update

$
0
0

DISCLAIMER:

Only for DVR's with current firmware version ending in: 20130426

Do not install on for any other reason. Please call if you are unsure.

This same error can be caused by an incorrect username/password.


This article is intended to update the firmware on the SAN/SBN series DVR's and fix the mobile phone connection issue. This error occurs when using Zviewer, any working mobile app, and attempting to view the cameras using port 7050. You will see a message that states "Max User Error". To fix that issue and to able to use Zviewer, you will need to update the DVR's firmware.


The steps below will show you how to update the firmware for your SAN/SBN series DVR. Please make sure you select the correct firmware. The 4 and 8 channel DVR share the same firmware, and the SBN6 has its own file for the firmware update. (You may also want to write down your network settings to reapply after the firmware has been updated.)

The firmware can be found here:

Procedures for DVR Firmware Upgrade
1. Format a USB disc, then copy the upgrading firmware to the USB;
2. Power off the DVR, then connect the USB disc to the DVR;
3. Power on the DVR, and enter the following interface:
4. In the "Upgrade” option, click , which brings the following pop up
screen:


5. Select the appropriate upgrading firmware, based on your DVR model (4CH
& 8CH DVRs use the same upgrading firmware), then click "Start". The
upgrade will start (do not power off during the upgrade process);
6. Once the upgrade is completed click cancel on the prompt to reboot the DVR. Then go to the save tab in the top right and select "Restore Defaults"  and when it is complete it will prompt you again, and at this point you may click restart.

DVR Keeps Re-initializaing Every 3-5 Minutes

$
0
0

Zmodo DVR’s have an auto overwrite feature that is designed to record over the earliest recordings once the hard drive is near full capacity. The overwrite feature, when turned on, allows the DVR to continue to record; however, when the overwriting sets in, the hard drive creates multiple partitions to manage the recording files. In the event that the hard drive creates more partitions than it can handle, the DVR will reboot every 3-5 minutes. 

We at Zmodo, recommend that you format the hard drive every 6 months to avoid running into a reboot loop on the DVR. Reformatting the hard drive will delete all the partitions and allow for the DVR to record again. Clear the partitions and reformat the hard drive successfully by following these instructions:

  1. Power OFF the DVR
  2. Make sure that the the cameras are disconnected.
    a. Unplug the yellow wires going to the back of the DVR or unplug all the cameras from the power adapter or their power source.
  3. Power ON the DVR
  4. Once the DVR is fully powered on, access the Main Menu.
  5. In the Main Menu select Device
  6. In the Device Menu select HDD
  7. Format the HDD

1. Backup any video files that you need before formatting the hard drive

2. Check the box under Select

3. Select Format HDD

4. The DVR will give you a message that says, "Format will remove all data from the hard drive.”

5. Select OK
8. Plug in or power the cameras on
9. Recording is indicated by the flashing HDD light or red R or M on the cameras.

ActiveX Settings for Internet Explorer

$
0
0
 
The first time you access any DVR system online (including the LiveDemo on Zmodo.com), you will need to change three ActiveX controls to "Prompt".
 
To change your ActiveX Controls, click on Tools, then select Internet Options.


Once in the Internet Options menu, click on the Security tab.


From the Security tab, click on Custom level...


Scroll down until you see ActiveX controls and plug-ins.
 
**For IE 9 users only: For the first option, Allow ActiveX filtering, select Disable.


**For all users: Scroll down farther through ActiveX controls and plug-ins, and change the following 3 values to 'Prompt':
  • Download signed ActiveX controls
  • Download unsigned ActiveX controls
  • Initialize and script ActiveX controls not marked as safe for scripting


When done, click OK and exit the Security Settings menu.

How do I return a product?

$
0
0
 
1. If your equipment appears to be defective or malfunctioning, you will need to contact our technical support team.  Many issues can be resolved without sending the items to us for repair. If the items must be returned, the technican will give you a case number to use to create an RMA online.
 
Technical support is available at 866-551-6881 Monday through Friday from 8:00 a.m. to 8:00 p.m. Central time. You can also e-mail us at support@zmodo.com. 
 
2. Make sure that you are within the manufacturer's one-year warranty for repair or replacement.
 
3. Complete a Return Request form at this link: Return Request Form
    • Please, include a valid case number.
    • Upload a copy of your invoice. 
    • Please, provide a detailed description of what issues you are having with the equipment, so that our RMA technicians know what to look for.
    • Select the "RMA Type." Most RMAs will be one of the following:
      • Repairing: You send us the defective items for repair or replacement
      • Return and Refund: Only available within 30 days of purchase, and is supject to various store refund policies.
  • Record your RMA number! This is how we can easily identify and track your return.
4. Send us your return.
  • After an RMA number is issued, you will receive an e-mail with detailed instructions on how to send the items to us.
  • Make sure to include your RMA number on the shipping label.
4. Our RMA department will test and repair or replace items that are covered under warranty at no cost to you.


Setting up a DDNS

$
0
0

THE DDNS (Dynamic Domain Name Server):
A DDNS is an online service that allows you to create a website name and access your DVR through that permanent name instead of your changing IP address.

Note: The free ZmodoDNS is only available on the newer Network Video recording systems such as the NVR, PoE, and the new Fox series IP Cameras. Other models will not have this available.  If you would like to learn how to setup the free Zmodo DNS service, check out KB article# 1080 (http://kb.zmodo.com/index.php?solution_id=1080)

· There are DDNS services built in to your DVR as well that you may choose from. The options are listed in the DDNS section of your DVR under the network menu. All Zmodo DVRs are compatible with the service at www.dyndns.com, except for the ZMD-DT-SNC4 and ZMD-DT-SCN8 which will work with NO-IP.com. 

· For simplicity, we will use DYNDNS.com as the example for this article. This service (as of July, 2013) costs $25 per year and is usually cheaper than purchasing a static IP from your Internet provider. It’s also simple to set up!  

· When you sign up for their $25 per year service at DYNDNS, you will create an account name and a password. Save this information!

· Log in with your user name and password at their website, and then you can create a host name(the website name). This will be similar to "namehere.dyndns.com."

· Next, in the DVR's menu under the network section is a DDNS setup section. This section will ask you for the following things:

o The service you are using, in this case “DYNDNS.”
o The username and password to the account you just created
o The hostname that you created

· Enter these pieces of information in to the DVR exactly as you created them, and apply/save these settings. Then restart the DVR to ensure the update takes place.

· You have now set up a reliable means of accessing your DVR without worry of your IP address changing. From now on you may use “namehere.dyndns.com” in place of your dynamic external IP address.

Connecting an Onvif Device to a 3rd Party Onvif Viewing Software

$
0
0

Many of the most recent IP based Zmodo products are Onvif compatible, which means that they can be viewed from 3rd Party viewing softwares such as iSpy and Genius Vision.  Please follow these steps in order to connect an Onvif compliant Zmodo product to a 3rd Party viewing software:


This tutorial describes how to connect an Onvif compliant camera to the software called Genius Vision.  You may follow the same steps if you are using a different software such as iSpy or Blue Iris.


Genius Vision can be downloaded safely from the manufacturer's website here: http://www.geniusvision.net/community.html

The complete PDF manual for Genius Vision can be downloaded safely from the manufacturer's website here: http://geniusvision.net/snapshot/GVUserManual.pdf


Once Genius Vision has been successfully downloaded and opened, please complete these steps to add an IP Camera to Genius Vision:


1. From the Main Menu, select New Objects > New Channel> Camera Setup.


2. From the Camera Setup tab, select RTSP video source as the Driver.

3. Check the box labeled "Use TCP streaming".

4. In the URL field, enter the camera's RTSP url using this template:

               The RTSP address of the main stream (720p) is:

               rtsp://xxx.xxx.xxx.xxx:10554/tcp/av0_0

               The RTSP address of the sub stream (VGA) is:

               rtsp://xxx.xxx.xxx.xxx:10554/tcp/av0_1

               ("xxx.xxx.xxx.xxx" is the device's IP address as reported by the IPC Search tool.)

5. Enter the correct login and password for the camera into the login fields.


The end result will resemble this image:


Click "Apply" to save this camera to Genuis Vision. You should now see the video stream of your camera in the channel grid.


You can now repeat these steps if you would like to add any additional cameras to Genius Vision.  Genius Vision can easily be setup to record when motion is activated by any of the cameras that are configured on Genius Vision.

Default Admin Passwords for Zmodo DVR Units

$
0
0


The following is a comprehensive list of all default DVR passwords for current and previous Zmodo DVR models:

_________________________________________________________________________________

SBN Series (H9104V, H9108V, ZMD-DD-SBN4, ZMD-DD-SBN8, ZMD-DD-SBN6)

SAN Series (H9114V, H9118V, ZMD-DD-SAN4, ZMD-DD-SAN8)

Login: Admin
Password: 111111 OR 888888
Click Here for more articles relating to this DVR.
________________________________________________________________________________

H8100 Series (H8104UV, H8108UV, H8106UV)

H8110 Series (H8114UV, H8118UV, H8116UV) 

Login: admin
Password: 666666
Click Here for more articles relating to this DVR.
_________________________________________________________________________________

ZMD-DT-SFN6

Login: admin
Password: (Blank)
Click Here for more articles relating to this DVR.
_________________________________________________________________________________


SCN Series(ZMD-DT-SCN4, ZMD-DT-SCN8)

SEN Series(ZMD-DH-SEN6)

Login: admin
Password: (Blank) or 111111
Click Here for more articles relating to this DVR.
_________________________________________________________________________________

NVR Series: Basic NVR(ZMD-NV-SBN4), Mini-NVR(ZH-NA04-W), and POE-NVR(ZP-NC14-P)

Login: admin
Password: 111111
Click Here for more articles relating to the Basic NVR.
Click Here for more articles relating to the Mini-NVR.
Click here for more articles relating to the POE-NVR.
     _________________________________________________________________________________
 
 
If your DVR is not listed in this article, then your DVR does not prompt you for a password or have one by default. You will need to look up your DVR and follow the password reset guidelines if you do not know it.

Monitor Client for ZMD-DT-SFN6 is in Chinese

$
0
0
The first time you open the ZMD-DT-SFN6 PC software Monitor Client it will be in Chinese or symbols.  To change the language to English you have two options.
 
First method: Switching out the software's language folders
1. Go to the file folder in which the Monitor Client installed
   (Generally should be C://Program Files (x86)/Monitor Client)
2.  Go into the "LANG" folder and delete the folder labeled "CHS"
3.  Rename the folder "ENG" to "CHS"
4.  Restart Monitor Client, and it should now be in English
 
Second method: Blind walkthrough menus
You can follow the screen shots below to navigate the menus and change the language from Chinese to English. Click on the icon outlined in red on each of the following screens. 


MonClient1


MonClient2


MonClient4


 MonClient4


MonClient4


MonClient6


Make Your DVR Wireless with Netgear WNCE3001

$
0
0

**This product is compatible with our DVRs, but this product is NOT supported by our Technical Support staff. Please review the documentation below and in the WNCE3001 User Manual for setup assistance.**


Step 1

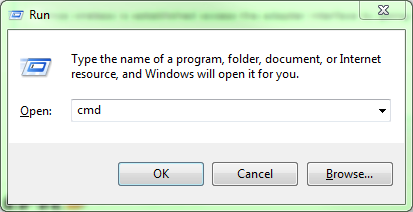
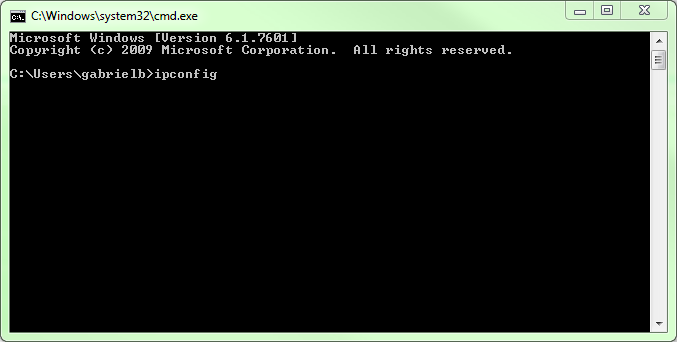
On a windows computer press the windows key plus the letter "R" (win+R)

In the box type "cmd" and press "Enter" a command prompt will appear.


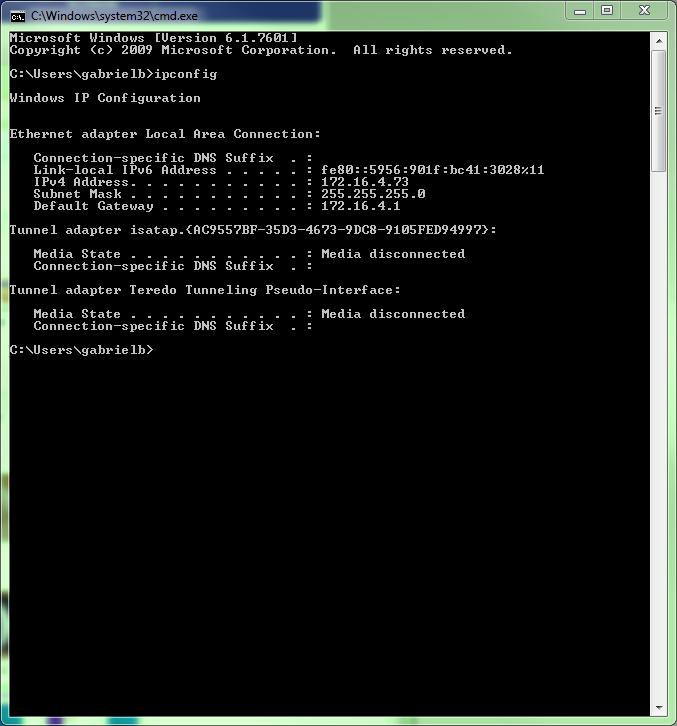
In the Command Prompt type "ipconfig" and press "Enter"

Your IP information will appear.

Write down the IPv4 address, Subnet Mask, and Default Gateway


Step 2

Follow the directions for the Universal Dual Band Wireless Internet Adapter to set-up wireless access between the router and the adapter.

Help documents for connection can be found here.


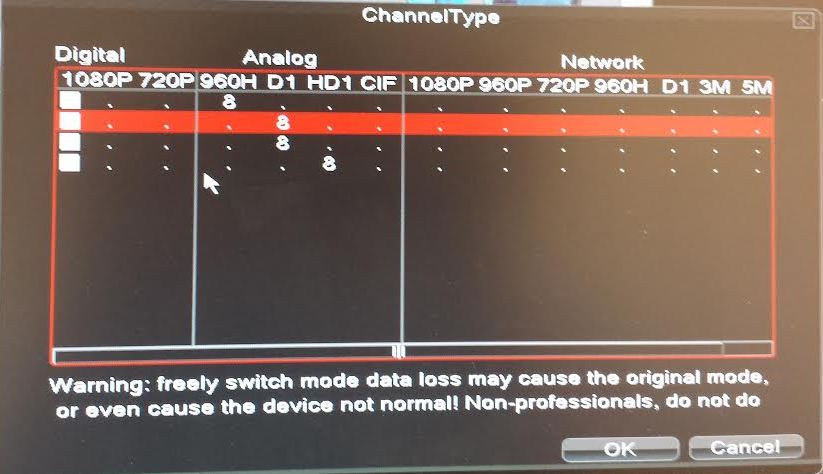
Once wireless is established access the adapter interface by going to http://www.mywifiext.net.

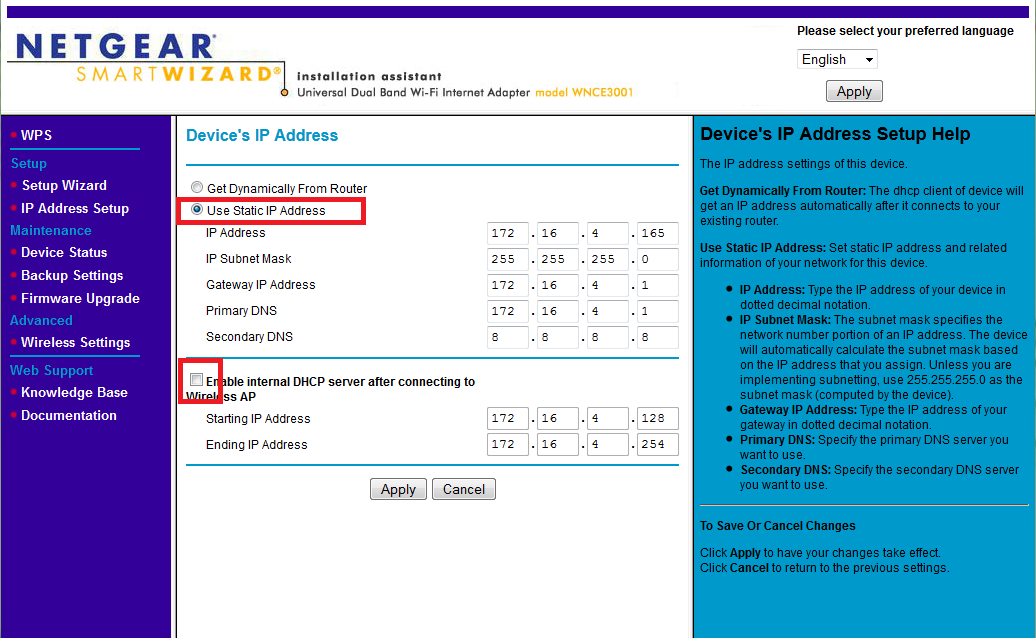
Select IP Address Setup.

On this page you will need to change the setting to Use static IP Address.

In the fields Enter the information you wrote down with one change.

For IP address change the last digits up by roughly 50 numbers. (In the example above I used 172.16.4.165 even though my computer was at 172.16.4.73 because I knew 172.16.4.165 was an open IP address)

In the Primary DNS enter the same number as the Gateway IP address field, for the secondary DNS use 8.8.8.8.

--Make sure the Enable internal DHCP server after connecting to Wireless AP is unchecked--

Select Apply and allow the adapter to reboot.


Step 3

Disconnect the adapter from the computer and connect it to the DVR. (Make sure to reconnect the computer to your network)

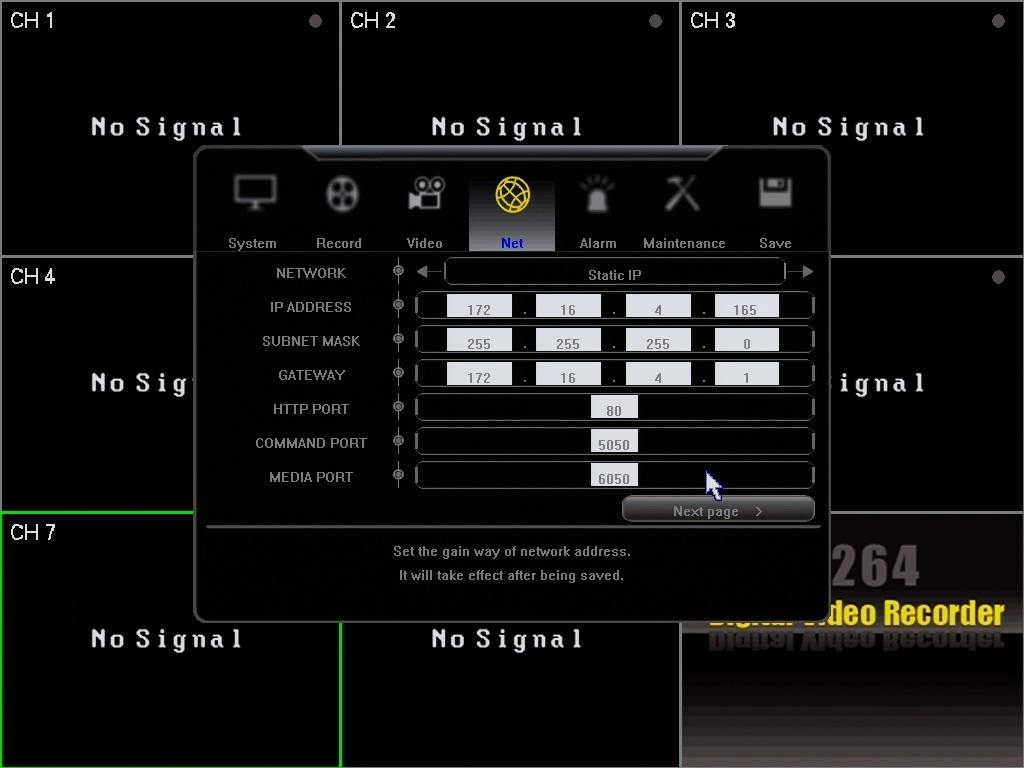
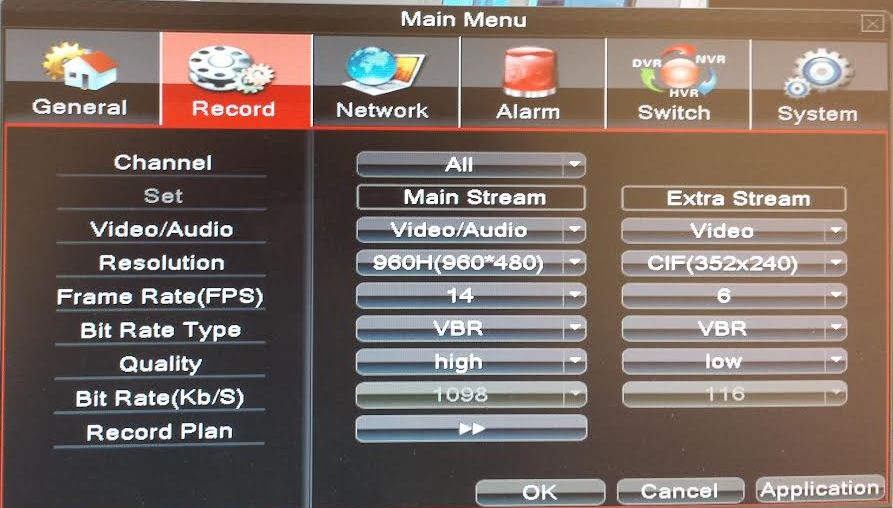
Go into the settings menu on the DVR and go to the network page.

Set the Network to "Static IP" Enter the same information you entered into the adapter for IP, Subnet Mask and Gateway.


Select Save and Save & Exit


You are set-up for local access to the DVR, use the IP address in IE to bring up the DVR interface.

For remote access the DVR consult the Network Guide and port forwading guides found here.

NVR Dynamic DNS Setup and Usage

$
0
0
Zmodo Dynamic DNS Setup and Usage
Zmodo is proud to introduce our new dynamic DNS service, which will allow our customers to automatically update their public IP addresses with our server and connect remotely to their devices through a friendly, easy to use interface. Getting everything set up is straightforward and should only take a few minutes.
 
Step 1. Sign up for an account at zmododns.com
 
Choose your desired username and password at our site. You will be informed if an existing user already exists, or if your email is already registered (limit 1 account per email).
 
 
Step 2. Create domain name(s) for use with your device(s)
 
Once signed in, you will need to add a domain. This will be the address used to access your device. Each account can request up to 5 domains for use with multiple devices at different IP addresses.
 
 
Enter the desired domain name into the blank and hit submit. If the name is available, the user will be informed of a successful domain creation. Otherwise, the user will need to choose a different name.
 
 
Step 3. Configure the NVR to use zmododns.
 
*The NVR must be actively connected to the internet prior to setting up dynamic DNS
 
a. In the NVR, navigate to "Configure system settings”, then "Configure network settings”, then click on the "DDNSSettings”.
 
b. Choose "zmododns” from the server drop down menu.
 
c. Enter the newly registered user name into the "Account” field and the password into the "password” field.
 
d. Enter the full registered domain name into the domain field (for this example, it would be mydvr.zmododns.com).
 
e. Be sure the "On” button is checked on the top left.
 
f. Click "Save” to save the settings.
 
Step 4. Access device via domain name or zmododns.com
 
The user may access his/her device directly via the domain registered (i.e. http://zmodoexample.zmododns.com)
 
Zmododns.com will also have the latest updated public IP address for each of the domains on the user's account. The log in interface is easy and intuitive, and will remember the user's session (no need to log in again on subsequent visits). Once logged in, the user will be presented with links to his/her domains.

ZMODO Zviewer iOS Mobile Application Instructions

$
0
0
ZMODO Zviewer for iOS


1. Software Installation

1.1 Introduction

Zviewer for iOS is the mobile app used to stream live video from your ZMODO H.264 DVR or IP Network camera, and supports a four channel simultaneous view. This guide focuses on the installation and use of the application.

1.2 Requirements

Hardware: iPhone mobile phone or iPod touch
System: iOS 4.3 or higher
Network: WiFi or GPRS

1.3 Installation Steps

Enter the iTunes App Store and download the Zviewer application.


2. Operation Instructions

2.1 Opening Program

Locate the Zviewer application and tap to launch. Once the application loads, you will see the main interface.


Start

2.2 Managing Device

From the main interface, tap the SETTING button on the bottom left corner of the toolbar, and select Device manage (See Setting) to enter the device management interface (See Devices).


Setting Devices

1) Add Device. In the device management interface (See Devices), tap the "+" button on the toolbar to enter the Add Device interface (See Add). The SAVE button will be enabled once all the required items are entered. Tap SAVE to save and go back to the device management interface (See Devices).


Add

2) Delete device. On the device management interface (See Devices), tap EDIT button on the toolbar or swipe one row of the list (See Delete 02) to delete a device.


Delete01 Delete02

3) Revising device information. From the device management interface (See Devices), tap the desired device, and make your changes (See Edit). Tap DONE on the toolbar to save, or tap DEVICES to exit without saving.


Edit

2.3 Playing Video

1) Tap any square box; a red border will appear around the channel when chosen (See Select).


Select

2) Tap the PLAY button. If the channel's video player does not automatically connect to a device, you will see a pop-up requesting a device selection (See Select Device). Select desired device to connect.


Select Device

3) From the Select Channel menu, tap the channel you would like to play (See Select Channel).


Select Channel

4) If the device information is correct, your video will start playing (See Play).


Play

2.4 Switching Devices

From the main interface, tap the SETTINGS button on the toolbar and select the Device Connect button (or long-press the channel's box) to enter the Select Device interface. The rest of the steps will be the same as listed under Section 2.3.

2.5 Switching Channels

1) Tap on CH at the bottom of the toolbar to reveal the channel selection panel (See Channel 1);
2) Select the channel you would like to play by tapping it;
3) Tap CH again to hide the channel selection


Channel 1 After Switch

2.6 Switching Display Modes

1) Double tap the video window to switch between single channel and four channel views;
2) To switch between Portrait and Landscape modes, orient your phone horizontally or vertically (See Portrait, Landscape).


Portrait


Landscape

2.7 PTZ Control

1) To reveal the PTZ toolbar, tap PTZ (See PTZ);
2) On the top row, the buttons from left to right signify: tilt up, pan left, zoom in, aperture increase, focal length increase. On the bottom row, the buttons from left to right signify: tilt down, pan right, zoom out, aperture decrease, focal length decrease;
3) To hide the PTZ toolbar, tap PTZ.


PTZ

2.8 Image Capture


In portrait mode, select a channel, and tap the SCREENSHOT button on the bottom right corner of the toolbar. The file will save to the photo directory of the phone.


Capture

ZMODO Zviewer Android OS Mobile Application Instructions

$
0
0
ZMODO Zviewer for Android OS


1. Software Installation

1.1 Introduction

ZMODO Zviewer for Android is a mobile app used to stream live video from your ZMODO H.264 DVR or IP Network Camera, and supports a four channel simultaneous live view. This guide focuses on the installation and use of the application.

1.2 Requirements

Hardware: Android OS Mobile Phone
System: Android 2.2 and above
Network: WiFi or GPRS

1.3 Installation Steps

From your Android device: Access Google Play, and download Zviewer.
From a computer: Go to: https://play.google.com/store, and download Zviewer. Connect your phone to the computer, copy the contents of this file to your phone's SD card, and install as prompted.


2. Operation Instructions

2.1 Opening Program


Locate the Zviewer application and tap to launch. Once the application loads, you will see the main interface.


Start


2.2 Connecting to Device

1) From the main interface, tap the SETTING button on the bottom left of the toolbar to enter the Device List interface;
2) If there are no devices added, you will be prompted with "No device, please add " (See No Device);
3) Tap ADD NEW DEVICE at the bottom to enter the device information;
4) Enter a name for the DVR, its IP address, port number, username, password, and number of channels, then tap OK to save your changes (See Device Add);
5) To delete or alter a device, long-press on the desired device (See Device Edit);
6) To return to the main page without making any changes, tap CANCEL.


No Device Device Add


Device Edit

2.3 Playing Video

1) From the main page, tap any channel's play window; an orange order will surround the chosen channel;
2) Tap the START button at the bottom of the toolbar to play the video (See Play); if you see a pop-up prompt stating "please connect to devices", make sure you have followed all instructions listed in Sec 2.2;
3) To stop streaming, tap the STOP button at the bottom of the toolbar.


Play

2.4 Switching Devices

1) From the main page, tap the SETTING button on the bottom toolbar to enter the device list (See Device List), or long-press the channel you would like to change;
2) Tap on the desired DVR to open a pop-up channel list (See Channel List);
3) Tap on the desired channel from the pop-up channel list; the program will automatically switch back to the main page, and play this channel's video.


Device List Channel List

2.5 Switching Channels

1) With the desired screen selected with the orange outline, tap CH at the bottom of the toolbar to reveal the channel selection buttons (See Channel);
2) Select the channel you would like to play; swiping your finger across the bar will reveal additional channels;
3) Tap the RETURN button to hide the CH toolbar and return to the normal toolbar.


Channel

2.6 Switching Display Modes

1) Double tap the desired channel to switch between four channel views and single channel views;
2) Switch between portrait and landscape views by turning your phone horizontally or vertically (See Portrait, Landscape). When viewing in Landscape mode, all functional buttons will be hidden.


Portrait


Landscape

2.7 PTZ Control

1) Double tap on the channel you would like to control to maximize the screen;
2) To reveal the PTZ toolbar if it is not up already, tap PTZ (See PTZ);
3) On the top row, the buttons from left to right signify: tilt up, pan left, zoom in, aperture increase, focal length increase. On the bottom row, the buttons from left to right signify: tilt down, pan right, zoom out, aperture decrease, focal length decrease;
4) To hide the PTZ toolbar, tap PTZ.


PTZ

2.8 Image Capture

In portrait mode, select a video, and tap the SCREENSHOT button at the bottom right corner of the toolbar. The file will save to the SD Card/zviewer directory.


Capture


PPPoE (Point-to-Point Protocol over Ethernet)

$
0
0

PPPoE (Point-to-Point Protocol over Ethernet)


Product:Any DVR, NVR, or IP cameras that require port forwarding.

Overview
Short summary on PPPoE internet connections and how to configure them to work with our DVRs.


PPPoE

PPPoE is a network protocol that is primarily used on DSL internet services. It is used mainly with with PPPoE-speaking DSL services where a PPPoE-speaking modem-routerconnects to the DSL service or when a DSL modem is connected to an ethernet router using an Ethernet cable. Basically it needs authentication or a log in info from the ISP for the modem with the router.

How does this affect Network Setups on our DVR's?

On PPPoE network setups, the DVR is configured in the same manner as any normal network setups. You can still change the DVR's network type to DHCP and set it up locally. However, for port forwarding to work, the modem will need to be bridged to a router. The router will also need to have the same log in information that the modem has, otherwise when bridging occurs, the customer will lose internet connection without the log in information of the modem.


Created by:Zmodo Support

Viewing all 208 articles
Browse latest View live