The full user manual for the DT-SAN4, DT-SIN4, DX-SAN8, and DX-SIN8 can be downloaded from this link:
↧
Complete User Manual for the DT-SAN4, DT-SIN4, DX-SAN8, and DX-SIN8
↧
How do I play back video on the SBN 4/8/6 or SAN 4/8?
These instructions will show you how to play back previously recorded video on the SBN and SAN series DVR's.
Note: Navigating through the DVR is most easily accomplished with the mouse that came with it.
After the DVR has booted up right click the mouse in order to log in. The default password is either 111111 or 888888.
After logging in right click the mouse 2 times to bring up the toolbar along the bottom. From this toolbar we will select the "Record Search" option. It will appear as an
arrow pointing to the right(the play symbol).
We are now in the playback screen. It is important to note here that, although the current days recordings are automatically populated in the grid, any time you adjust the
date at the top you must click the search button at the bottom in order to populate that new day. If you do not you will just receive a failed search message.
(NOTE: Another important point is that the date you see at the top of the page when first going in is the date the DVR is set to. If you want to see yesterdays footage you
must do so based on the date and time the DVR recorded that footage as, not necessarily as the current days date.)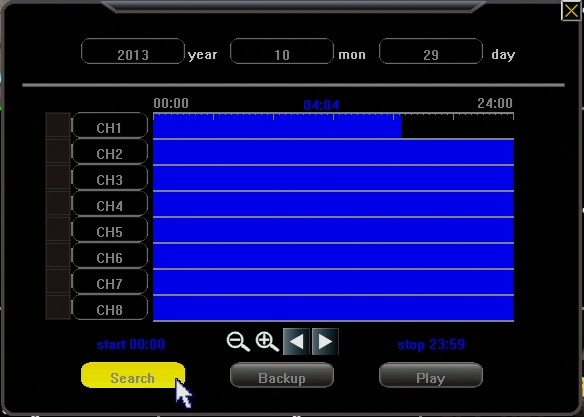
After the desired day has been set and you have clicked search the grid in the middle will have the video for that 24 hour period loaded in to it. From left to right the grid goes from midnight(start of day) to midnight(end of day). The horizontal bars are broken down by channel. In order to see video footage you will select a start and a stop point on the grid as shown below. Be sure to put a checkmark in the box of the channels on the left you wish to watch. Only after doing all of this, press the "Play"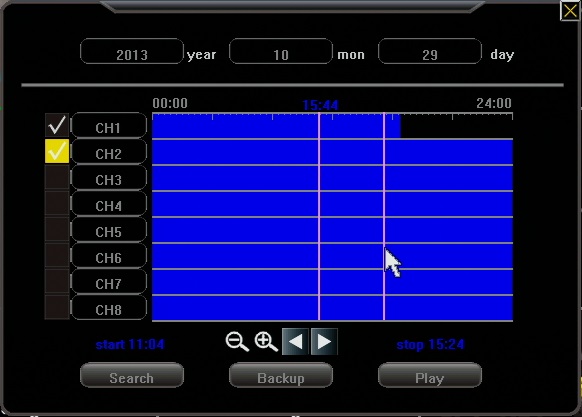
After pressing play you will be taken in to your video for the selected channels. Your video controls will be along the bottom. Controls include Rewind, Pause, and Fast forward. Pressing the stop button will take you back to the video search screen.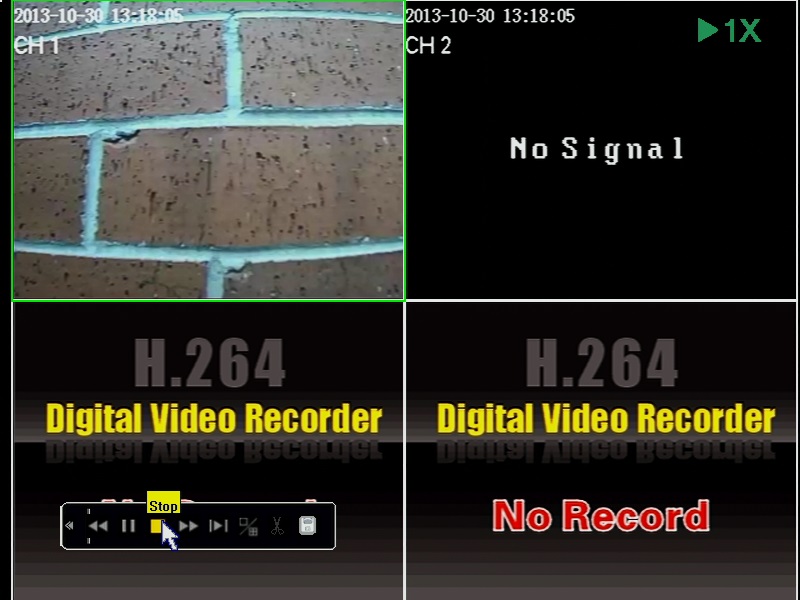
↧
↧
How do I backup video recorded on my SBN 4/8/6 or SAN 4/8 DVR?
These instructions will show you how to backup previously recorded video on the SBN and SAN series DVR's.
Note: Navigating through the DVR is most easily accomplished with the mouse that came with it.
After the DVR has booted up right click the mouse in order to log in. The default password is either 111111 or 888888.
After logging in right click the mouse 2 times to bring up the toolbar along the bottom. From this toolbar we will select the "Record Search" option. It will appear as an
arrow pointing to the right(the play symbol).
We are now in the playback screen. It is important to note here that, although the current days recordings are automatically populated in the grid, any time you adjust the
date at the top you must click the search button at the bottom in order to populate that new day. If you do not you will just receive a failed search message.
(NOTE: Another important point is that the date you see at the top of the page when first going in is the date the DVR is set to. If you want to backup yesterdays footage you must do so based on the date and time the DVR recorded that footage as, not necessarily as the current days date.)
After the desired day has been set and you have clicked search, the grid in the middle will have the video for that 24 hour period loaded in to it. From left to right the grid
goes from midnight(start of day) to midnight(end of day). The horizontal bars are broken down by channel. In order to see video footage you will select a start and a stop
point on the grid as shown below. Be sure to put a checkmark in the box of the channels on the left you wish to backup. Only after doing all of this, press the "Backup" button.
*NOTE: If at this point you receive a "No Device Attached" error see remarks at bottom of article.
After clicking "backup" a window will be displayed giving you the final options before backing up your footage. The most important thing you will want to do here is adjust the file type to "AVI" as shown below. This will allow all Vista and newer windows computers to play the file through windows media player. If you are on an older version of windows you will want to download VLC media player in order to play back the footage on a computer. Finally click "backup" and your footage will be copied to your USB flash drive.
*No Device Attached - If you receive this message while having a USB device connected to the DVR while trying to back up it means that your USB drive is currently trying to use more power than the DVR has available at that USB port. This is sometimes seen with newer flash drives that use more electricity to run, or drives with LED lights that light up on them. It is recommended you use as basic of a flash drive as you have available. If you don't have another drive available at the moment you can attempt to unplug the mouse and use the remote control instead. Doing this stops the DVR from powering the mouse and will sometimes allow it to recognize the flash drive.
↧
Reset Password to Factory Defaults for SBN4, SBN8, SBN6, SAN4, and SAN8
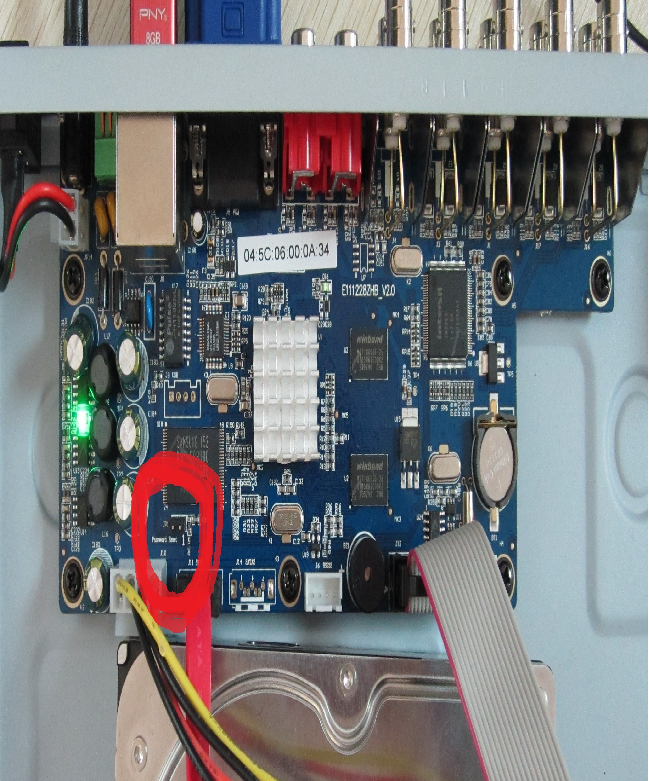
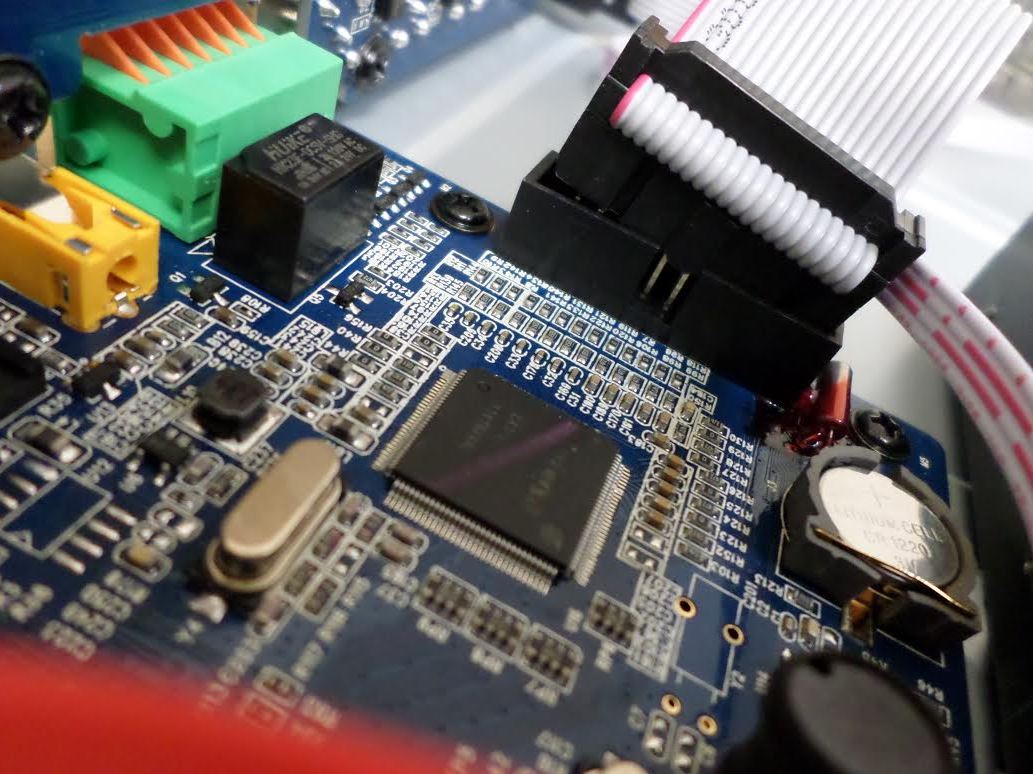
To restore your password to factory defaults, you will need to jump the two pins on the motherboard as shown below.
To do this, you only need to use a flathead screwdriver or metal paper clip to connect the two pins together. Make sure the metal of the screwdriver or paper clip connects both pins to reset the password.
↧
Connecting an Onvif Device to a 3rd Party Onvif Viewing Software
All of the current IP based Zmodo products are Onvif compatible, which means that they can be viewed from 3rd Party viewing softwares such as iSpy and Genius Vision.
The following video describes how to connect an IP camera to the 3rd party viewing software called iSpy:
The steps below describe how to connect an Onvif compliant camera to the software called Genius Vision. You may follow the same steps if you are using a different software such as iSpy or Blue Iris.
Genius Vision can be downloaded safely from the manufacturer's website here: http://www.geniusvision.net/community.html
The complete PDF manual for Genius Vision can be downloaded safely from the manufacturer's website here: http://geniusvision.net/snapshot/GVUserManual.pdf
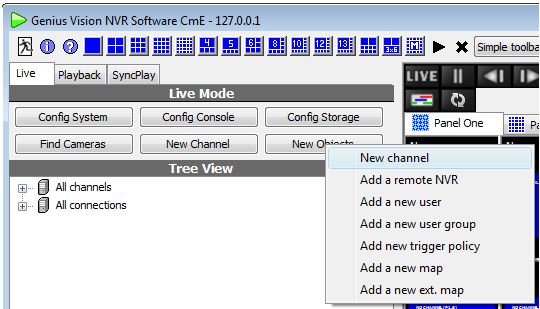
Once Genius Vision has been successfully downloaded and opened, please complete these steps to add an IP Camera to Genius Vision:
1. From the Main Menu, select New Objects > New Channel> Camera Setup.
2. From the Camera Setup tab, select RTSP video source as the Driver.
3. Check the box labeled "Use TCP streaming".
4. In the URL field, enter the camera's RTSP url using this template:
The RTSP address of the main stream (720p) is:
rtsp://xxx.xxx.xxx.xxx:10554/tcp/av0_0
The RTSP address of the sub stream (VGA) is:
rtsp://xxx.xxx.xxx.xxx:10554/tcp/av0_1
("xxx.xxx.xxx.xxx" is the device's IP address as reported by the IPC Search tool.)
5. Enter the correct login and password for the camera into the login fields.
The end result will resemble this image:
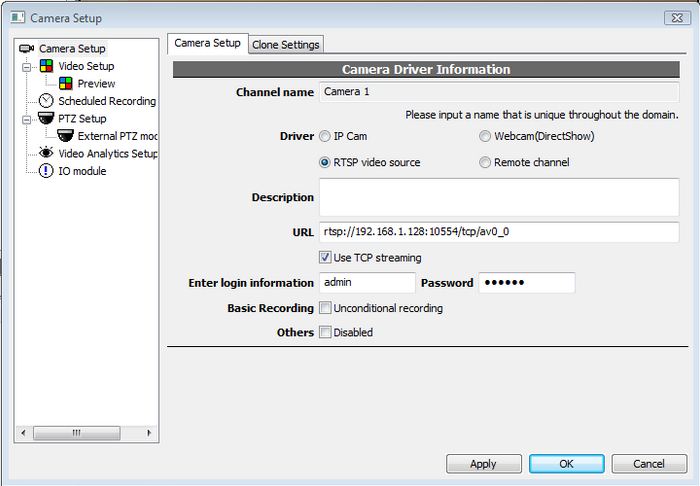
Click "Apply" to save this camera to Genuis Vision. You should now see the video stream of your camera in the channel grid.
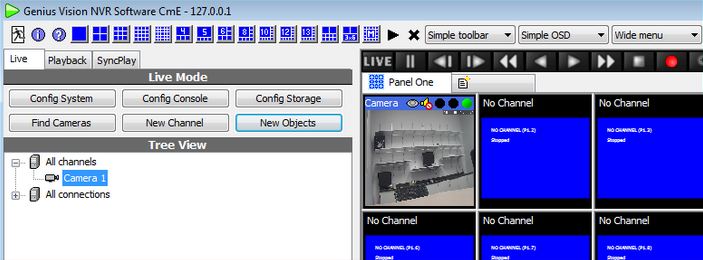
You can now repeat these steps if you would like to add any additional cameras to Genius Vision. Genius Vision can easily be setup to record when motion is activated by any of the cameras that are configured on Genius Vision.
↧
↧
How to Weatherproof Cable Connections
When installing cameras outdoors, it is always necessary to weatherproof the ends of the cables where the camera connects to the cable.
It is a good idea to weatherproof the entire length of cable that is outdoors to fully extend the lifetime of the cable, but the cable ends are especially not weatherproof.
To weatherproof the cable ends, you can either tape the cable ends or install the cable ends into a conduit box. By far the safest option is to install the cable ends into a conduit box to protect the cable ends from the rain and wind.
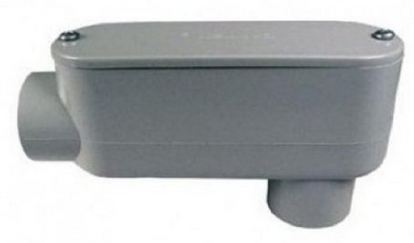
A simple search for "conduit box" on Amazon.com will lead to many different options at different price ranges. This item is also readily available at hardware stores such as Lowes or Menards.
If you do decide to tape the cable ends isntead of installing them in a conduit box, it is highly recommended to wrap plastic around the cable end first and then tape the plastic to the cable. This makes it easy to remove the tape and plastic in the event that you need to unplug the cable in the future.
↧
How to Setup PTZ Cruise on the DT-SFN6
The first thing you will need to do would be to store the presets that you would like to have in your tour using the PTZ control menu, get to this menu by right clicking with the mouse and then selecting PTZ control.
From there you will move the camera to the desired location, then specify the number, then select store, and then you will repeat that for each of the stop points that you would like your tour to have.
Once the presets have been set you will then go into the setup, then system setup, then PTZ setup. From there you will add the desired presets to the tour position list by clicking the left and right arrows next to the word preset to select a preset and then clicking the add button.
Once the presets have been set you will then go into the setup, then system setup, then PTZ setup. From there you will add the desired presets to the tour position list by clicking the left and right arrows next to the word preset to select a preset and then clicking the add button.
You can also specify the "Keep Time" which is the amount of time the camera will sit on that specific preset. Once you have configured the tour how you would like it, you will then start the tour by going back to the PTZcontrol section and checking the box next to tour start.
↧
Remote Network Setup
Once you have completed the Local Network Setup, you should have an internal IP address for your DVR.
The next step in the process is to forward ports pertaining to the DVR, so that you can see your cameras remotely.
We recommend that you follow the steps in our network tutorial located at www.zmodo.com/network. This video walks through using our network tutorial:
Forward DVR's Ports
1) Log in to your router by entering the gateway IP, such as 192.168.1.1, in to your browser window. Enter the login information for your router. If you cannot remember this, you can check the default username/password combinations for most routers at http://www.pcwintech.com/default-router-modem-passwords. If you are unable to locate this information, please contact your router manufacturer or Internet Service Provider.
2) Once you've logged in to your router, you will need to enter the Port Forwarding section of your router. There, you'll enter the IP address, protocols, and port numbers for your DVR.
IP Address = IP address in your DVR's Network SettingsProtocol = BOTH (TCP/UDP) OR TCPService or Application Name can be anything you wish, like DVR1 or DVR2Create 1 rule per port number; Start and End Ports will be the same number
Here are the default ports for Zmodo units (last port # is the mobile port):
H9104, H9108, H9106, H9116: 80, 9000, 18004H9114, H9118: 80, 5050, 6050, 7050H9124, H9128, DR-SFN6: 80, 9000, 15961H8000/H8100 series: 80, 7777, 8888Note: If you are using a DSL internet service, you may need to use port 81 (instead of 80) as your web port. If so, be sure to change this in your DVR's network settings, and restart the unit. Once the port number is changed, you will need to use it when connecting to the unit (ie. http://192.168.1.1 becomes http://192.168.1.140:81)
3)Below are screenshot samples of common router's Port Forwarding sections. Please note that exact locations may differ depending on your router's model. If your model is not listed, try looking through Advanced, Firewall, or Forwarding sections in your router to find the exact location.
Linksys
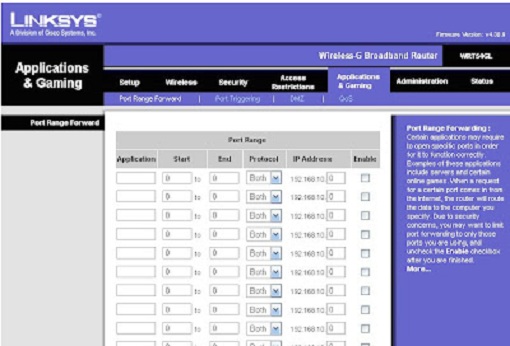
In Linksys routers, you will typically enter Applications & Gaming, then Port Range Forward. Exact names/places will differ depending on model. Be sure to create forward 1 port range per line, and check the 'Enable' box at the end of the line, then save changes.
Netgear
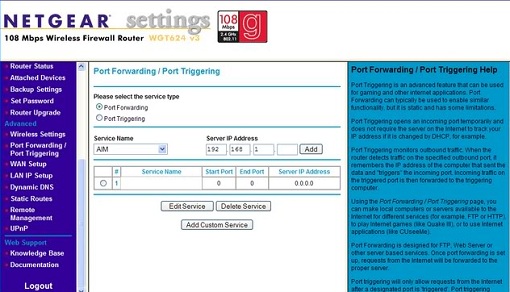
In Netgear routers, you will typically look under Advanced for Port Forwarding/Triggering. Select Port Forwarding as your service type. Then, select 'Add Custom Service' for each port you forward.
D-Link
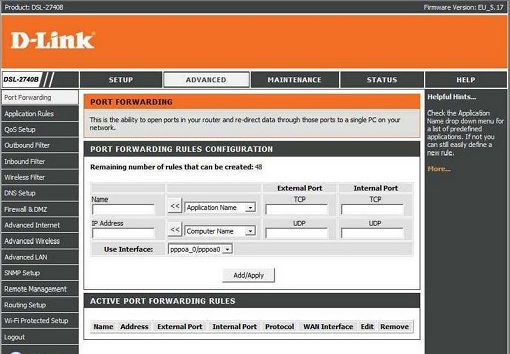
For D-Link Routers, you will enter Advanced, then Port Forwarding. Click 'Add/Apply' when you have finished each rule.
Belkin
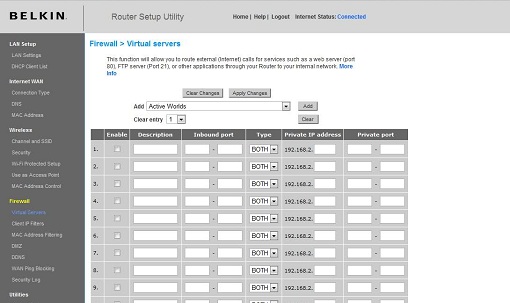
For Belkin routers, access port fowarding under Firewall, Virtual Servers. Be sure to check the 'Enable' box, then hit the 'Set' button, and save your changes.
2-Wire
For 2-Wire modems, enter Firewall, then Advanced Settings.

First, look for the DVR's IP address under (1) Select a computer. If you do not see the DVR's IP address here, you may need to go in to the DVR's Network Settings, and set the DVR to DHCP (instead of Static), then reboot the DVR. Once the unit reboots, check it's IP address in the Network Settings, then go back to your router to select the DVR from the list.
Next, you will need to click on "Add a new user-defined application", to come to the this new screen:

Create your rule, and click 'Add Definition'. Create a rule for each port. Then, click Back.
When done, select each application you have created, and click 'Add', so that you see the desired applications in the Hosted Applications table. When finished, click 'Done' at the bottom of the screen.
Netopia
For Netopia routers, click on the Configure tab at the top of the page.
Next, click on Advanced.
From the Advanced menu, click on Pinholes.

Create your rule, then hit 'Submit', and repeat for each port. When you have completed, click on the yellow triangle with an '!' inside (located at the top righthand corner) to save your changes.
Checking Your Connection
4) Once you have forwarded all ports necessary for your DVR, you'll want to check and make sure each of these ports was successfully opened. To check this, go to http://www.yougetsignal.com/tools/open-ports/
Here, you will see fields for Remote Address and Port Number.
To check that your ports are open, enter each port you've forwarded (one at a time) in to the Port Number field, and click 'Check'.
If you see a green flag, and a statement "Port X is open on XXX.XXX.XXX.XXX", you have fowarded your ports correctly. You are now able to view your DVR remotely.
If you see a red flag, the port is not open. Go back in to your router, and double check at all information is correct. In some cases, a port may be blocked by your ISP. To find out why, or to request it opened, please contact your ISP.
Important: The Remote Address that you see is your DVR's external IP address. This is the address that you will use to access your DVR from a different computer. Write this down!! And remember, ActiveX settings must be changed on each new computer that you are viewing from before you'll be able to bring your DVR up.
↧
How to Enable Email Alert with SnapShot on the SCN4 or SCN8
The following steps describe how to enable email alerts with snapshot for the SCN series DVR. This video describes these steps as well:
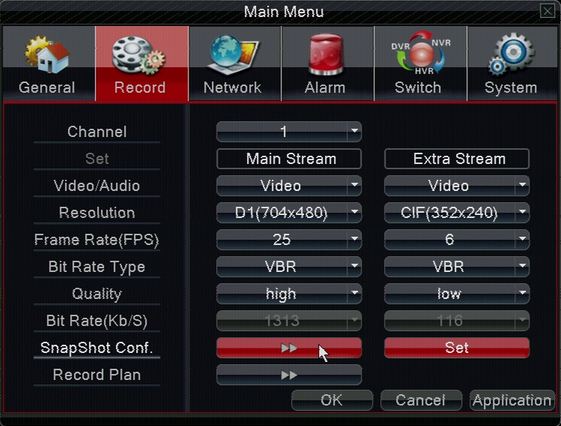
In order for the email alert to function properly with snapshot, you need to go into the "Switch" tab in the main menu and change the recording resolution. If you have the four-channel DVR, select D1 instead of 960H. If you have the eight-channel version, select HD1. The DVR will not send successful email snapshots when set to 960H mode.

Then under the DVR "Alarm" menu, enter the motion detection settings interface and select the desired channel number and email capture function.
Last, go to the Record tab in the main menu and select SnapShot Conf. From here, make sure the correct time period is enabled and your email alerts should begin to include snapshots.
↧
↧
How to View a QR Code Scan Device Using an Internet Explorer Browser
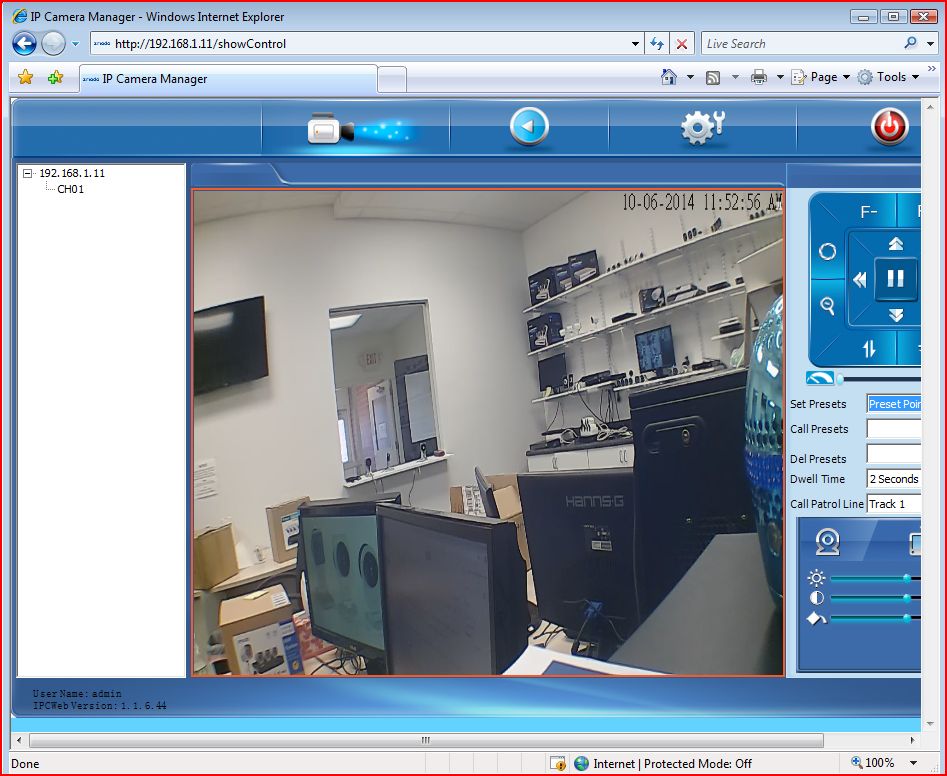
The IP Cameras, NVRs, and DVRs that have a QR scan code are designed to be viewed from the mobile app called ZSight, however you do have the option of logging into a QR code device and viewing it from Internet Explorer.
First, click this link to download a program called IPC Search: http://www.zmodo.com/media/downloader/ZH-IXA15-WC/IPCSearch1.0.13_Setup.exe
Next, run IPC Search from a computer that is connected to the same router that your QR code device is conencted to. IPC Search will show all of the Zmodo QR code devices that are on that router.

Next, make sure that all Internet Explorer ActiveX plugin settings are set correctly. The guide to setting up ActiveX can be found here: http://kb.zmodo.com/index.php?solution_id=1022
Next, find the IP address of your QR code device on the IPC Search program, and type that same IP address number into an Internet Explorer browser.
The default login is admin. The default password is 111111.

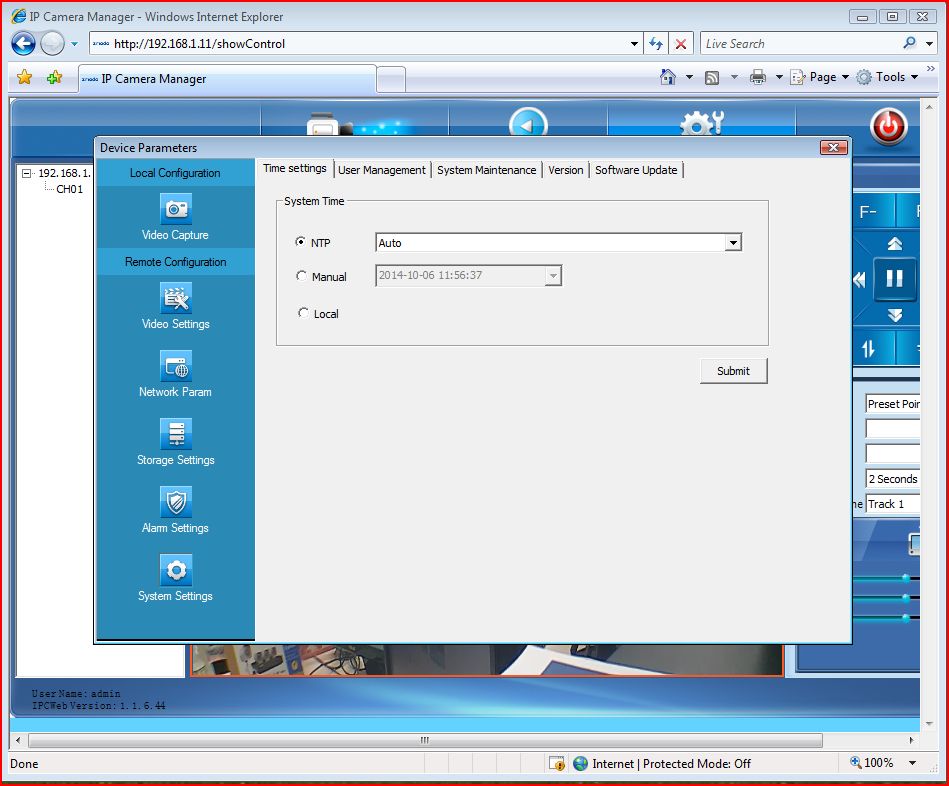
Once you are logged into your device in Internet Explorer, you can view the video stream and change settings for the device.
↧
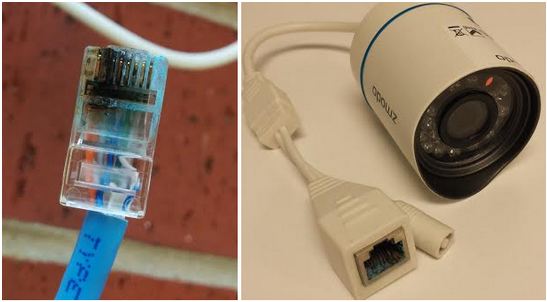
How to Repair The Cable on a Simplified POE Camera
The cable pinout on the Simplified POE camera is different from the stanrard LAN cable because only four out of the eight cables within the LAN cable are actually used.

If the cable on the camera is damaged and needs to be replaced, please use the diagram above to model how to reinstall the cables into the pin positions.
Pins 1 and 6 are power, pin 1 is negative and pin 6 is positive. Pins 2 and 3 transmit data to and from the camera.
**Please do not use this diagram to create a pinout for a separate power source for the Simplified POE cameras. The cameras use a proprietary data communication protocol, therefore the only way to power on the camera is to directly connect it to one of the back ports on the the Simplified POE NVR.
↧
How to Extend the Wireless Signal Range on Zmodo IP Cameras
If you would like to install any number of Zmodo Wireless cameras relatively far away from your router, you can boost the Wireless communication on the camera by installing a 2W 2.4Ghz Wifi Wireless Broadband Amplifier onto the camera.
http://www.amazon.com/gp/product/B00HJ1NQLS/ref=oh_aui_detailpage_o00_s00?ie=UTF8&psc=1
A Wireless Broadband Amplifier is only compatible with wireless cameras with antennas such as the ZMD-ISV-BFS23NM, ZP-IBH13-W, and ZP-IBI13-W. This device is not compatible with the ZH-IXA15-WC, EZCam ZM-SH721, or ZP-IDP15-W models because these cameras do not have antennas.
In order to use a Wireless Broadband Amplifier, you will need to connect the amplification device to the antenna port on the camera, and connect the amplification device to a power source that is separate from the camera's power source.
We tested the Wireless Broadband Amplifier from the link above with several wireless Zmodo cameras, and we've found that attaching the amplification device to the camera increases the wireless range by approximately 30 feet.
↧
June 2014 Firmware for DT-SCN4 & DT-SCN8
If your DVR resembles this exact DVR, then the firmware attached to this article is compatible with your DVR unit.

The June 2014 firmware update for DT-SCN4 and DT-SCN8 improves settings stability and supports email alerts with snapshot.
In order to update firmware to your DT-SCN4 or DT-SCN8, please save the attachment that is attached to this article to a USB flash drive. The attachment must e the only item by itself on the USB flash drive, the attachment must also not be in a folder. Lastly, the attachment must be named "HY_LSX_MBD6304T_V4.02.R11.20140606" in your USB flash drive.
Once you have the HY_LSX_MBD6304T_V4.02.R11.20140606 file saved to a USB flash drive, insert that USB flash drive into an open USB port on the DVR unit.
When the USB drive is insterted into the DVR unit, please go to Main Menu > System > Upgrade.
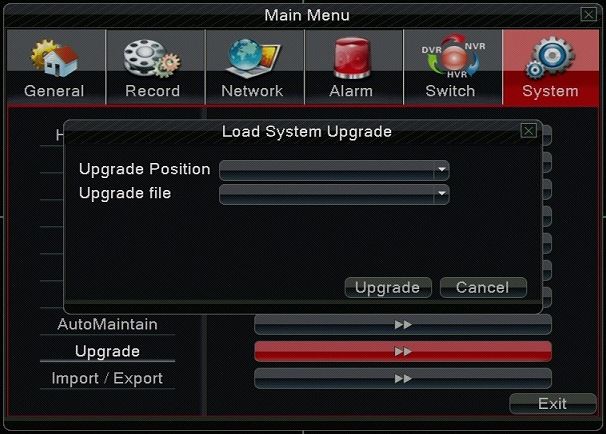
From this menu, select "Upgrade" and do not power off the DVR until the update is completely finished loading. The DVR will reboot at least one time during the update process.
↧
↧
Which DVRs are Compatible with 3TB and 4TB Hard Drives?
Western Digital recently released a 3TB DVR rated Hard Drive and a 4TB DVR Rated Hard Drive in the Purple series. The following is a list of current Zmodo DVRs and whether they are compatible with Western Digital's new 3TB & 4TB HDDs:
DX-SIN* / DT-SAN* - Formatted successfully. Records and plays back successfully. Recognized the full 3TB of available storage. Compatible.
DT-SFN6 - Formatted successfully. Records and plays back successfully. After the HDD was formatted, the DVR only showed 2041 available GB of storage instead of the correct 3000GB of storage. This DVR may have issues reading the correct capacity of a large size HDD.
DT-SCN* - Formatted successfully. Records and plays back successfully. Recognized the full 3TB of available storage. Compatible.
DD-SAN* / DD-SBN* - The DVR would detect the HDD, but would not format the HDD successfully. Additionally, the DVR would randomly reboot often when the HDD was installed in it. Not Compatible!
720P NVR (ZP-NB14) - Formatted successfully. Records and plays back successfully. After the HDD was formatted, the NVR only showed 512 available GB of storage instead of the correct amount of storage. This NVR may have issues reading the correct capacity of a large size HDD.
POE (ZP-NC14-P) - Formatted successfully. Records and plays back successfully. After the HDD was formatted, the NVR only showed 512 available GB of storage instead of the correct amount of storage. This NVR may have issues reading the correct capacity of a large size HDD.
Simplified POE (ZP-NC14) - Formatted successfully. Records and plays back successfully. After the HDD was formatted, the NVR only showed 512 available GB of storage instead of the correct amount of storage. This NVR may have issues reading the correct capacity of a large size HDD.
We generally do not recommend installing a Hard Drive that has a larger file space than 2TB, however if your application requires a larger HDD we recommend only using the Western Digital Purple Grade 3TB or 4TB Hard Drive at this time.
↧
Connecting a wireless camera to WiFi using a Smartphone
Connecting camera to WiFi using a Smartphone
On cameras which have a QR scan code on the back, you can use either your smartphone or a PC to connect the camera to WiFi. If the camera does not have a QR scan code, then you will need to use a PC to connect the camera to WiFi. This article walks through how to connect your camera to WiFi using your smartphone.
First download and install the Zsight app from the app store on your smartphone
Android iPhone

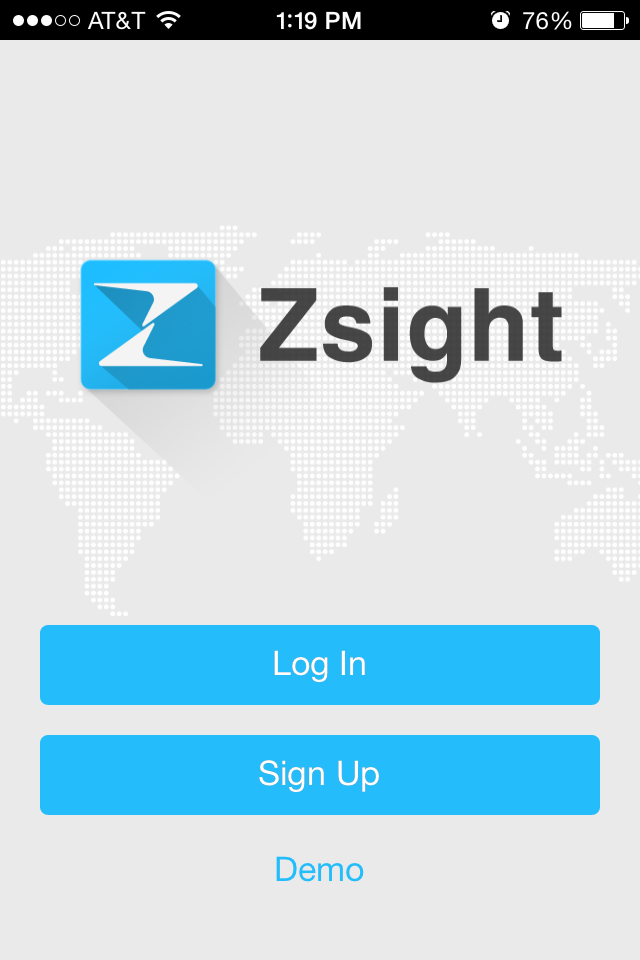
Once installed, sign up and log in to the Zsight app
Android iPhone
![]()
![]()
Tap the " + " symbol in the top right corner to add a device, select “Scan QR Code”
Android iPhone
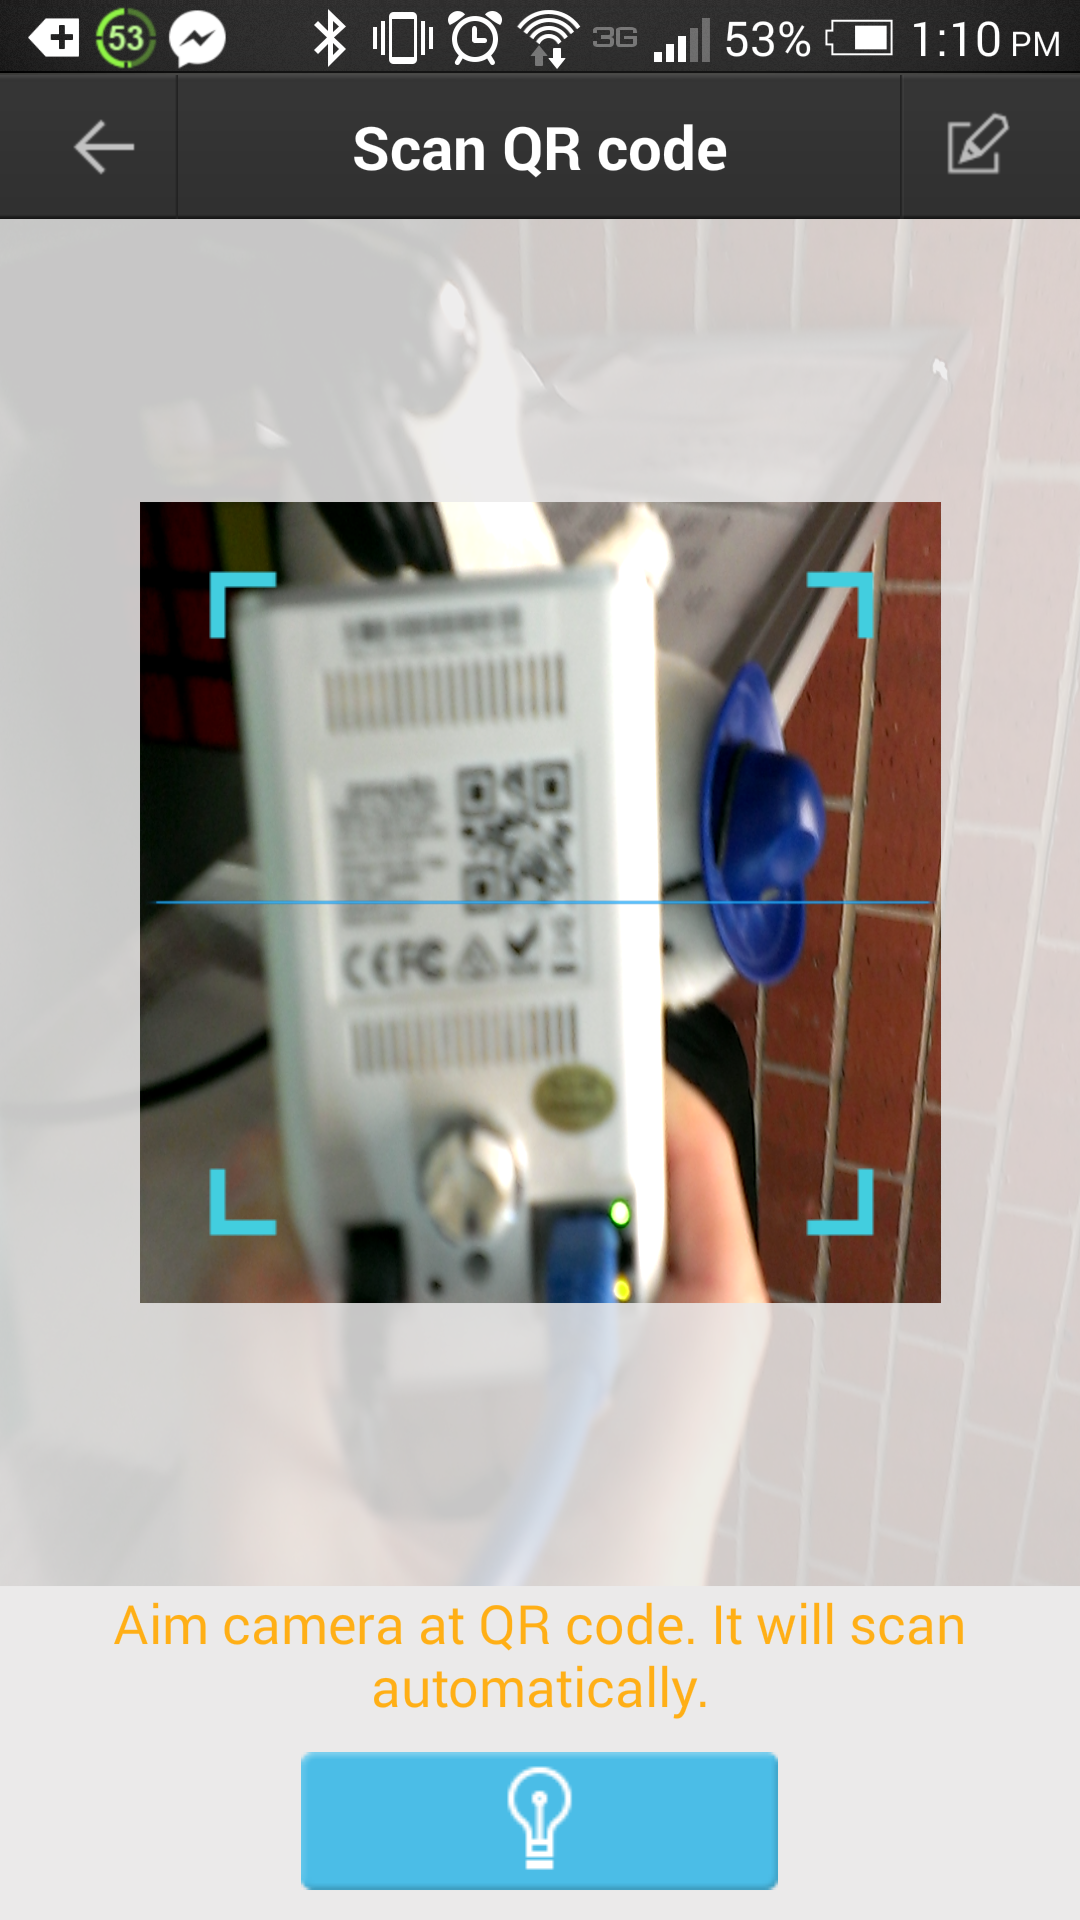
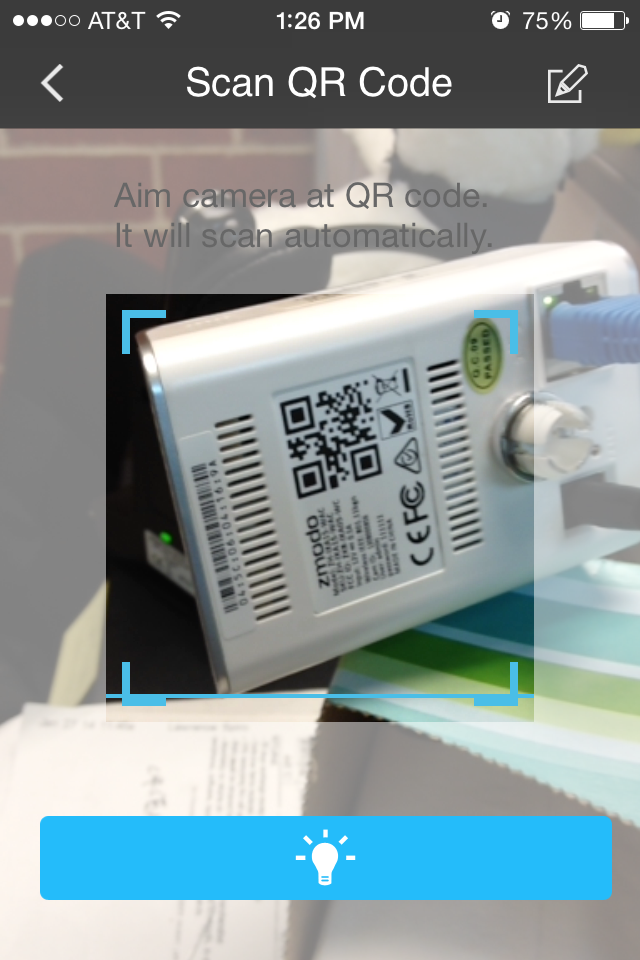
Position the phone and camera so that the QR code is inside the box on screen as shown. Once the phone successfully scans the camera, it should move to the next screen.
Android iPhone
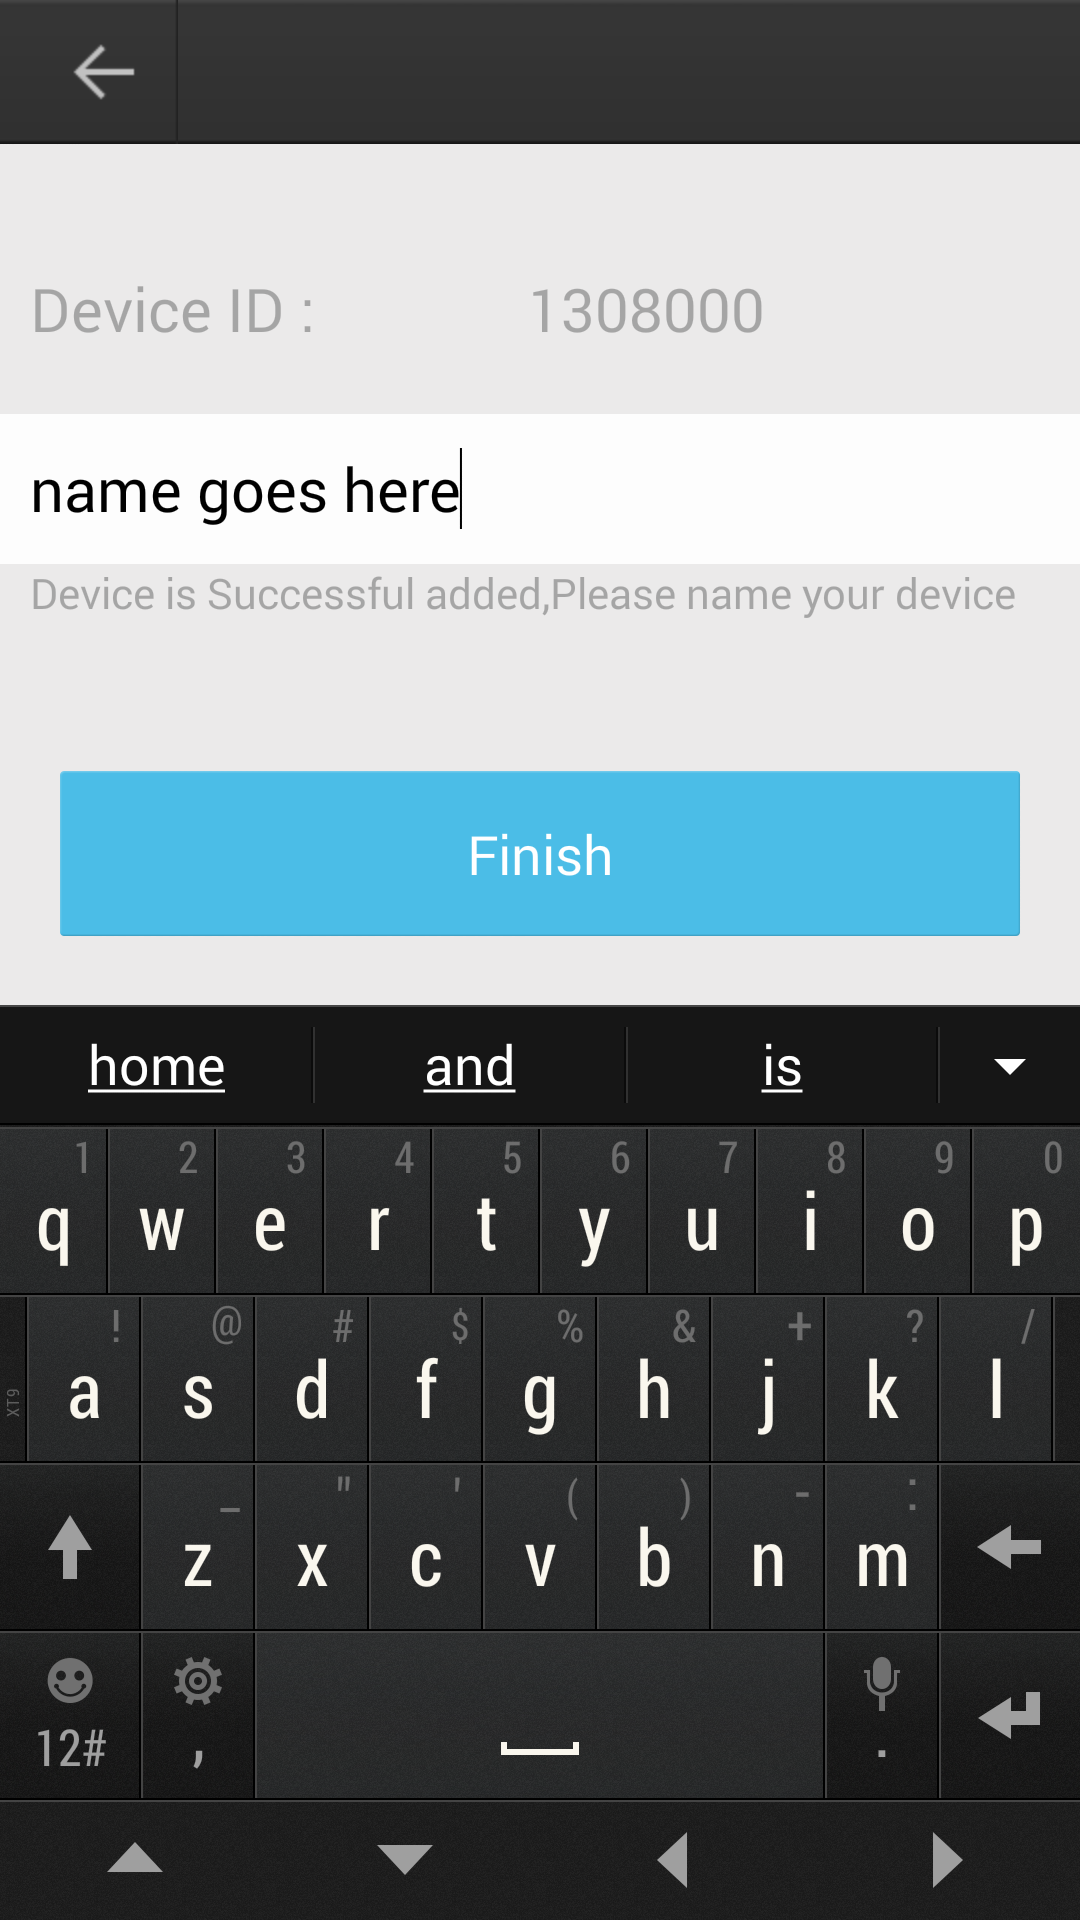
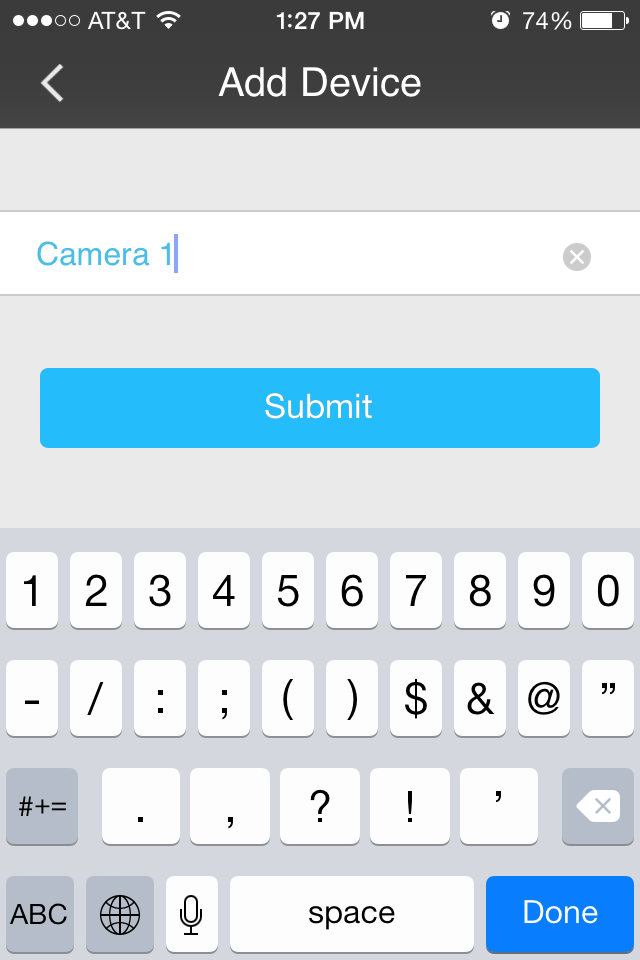
You can then give the camera any name that you would like.
Android iPhone
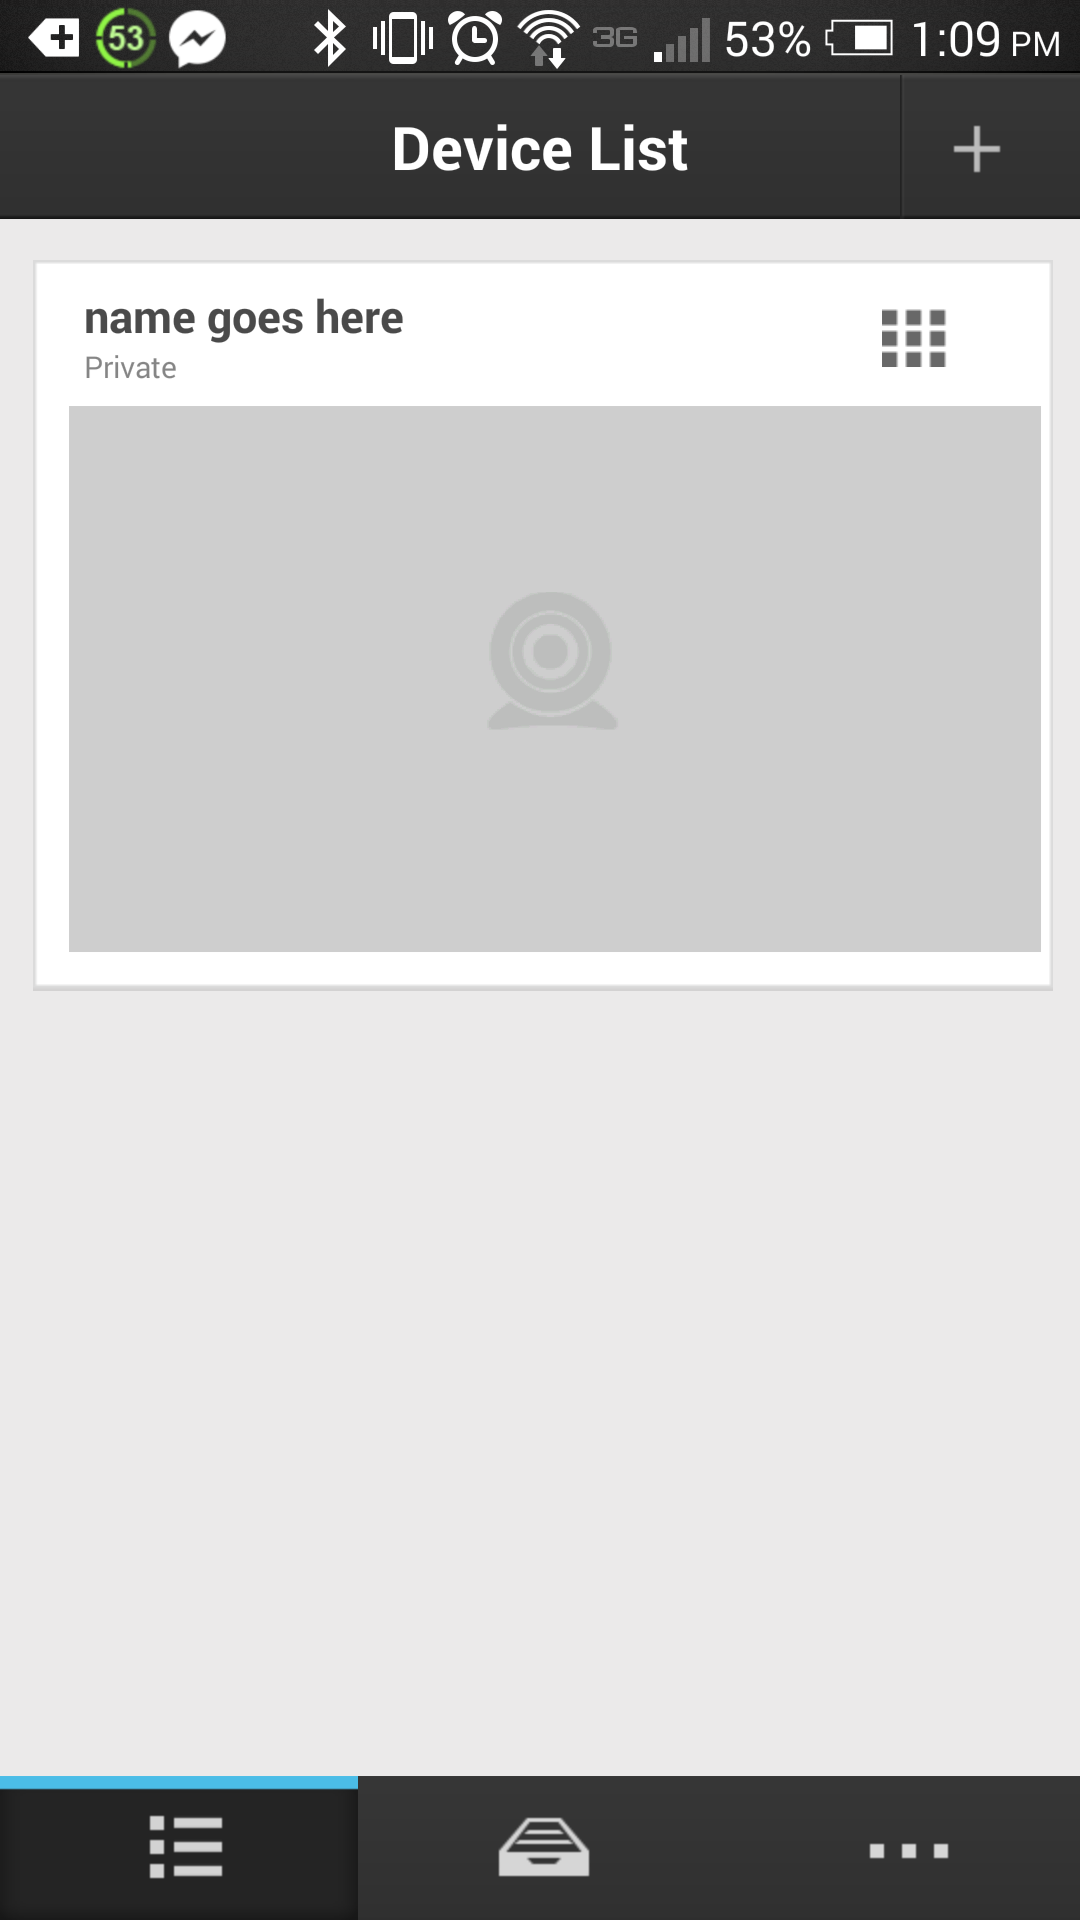
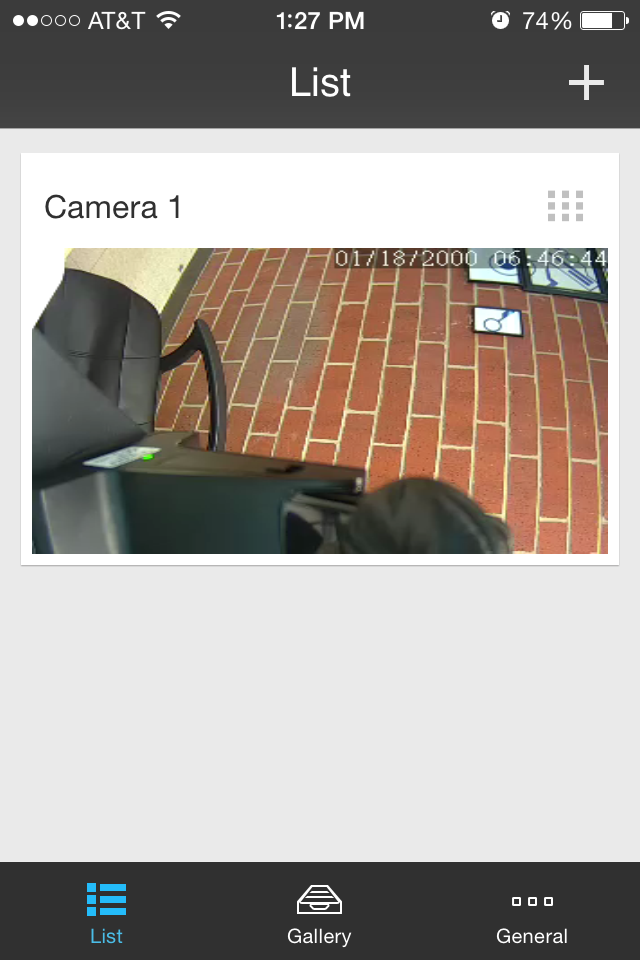
Once you can see the name you gave in the list, tap on the camera listed there to bring up the live image.
Android iPhone
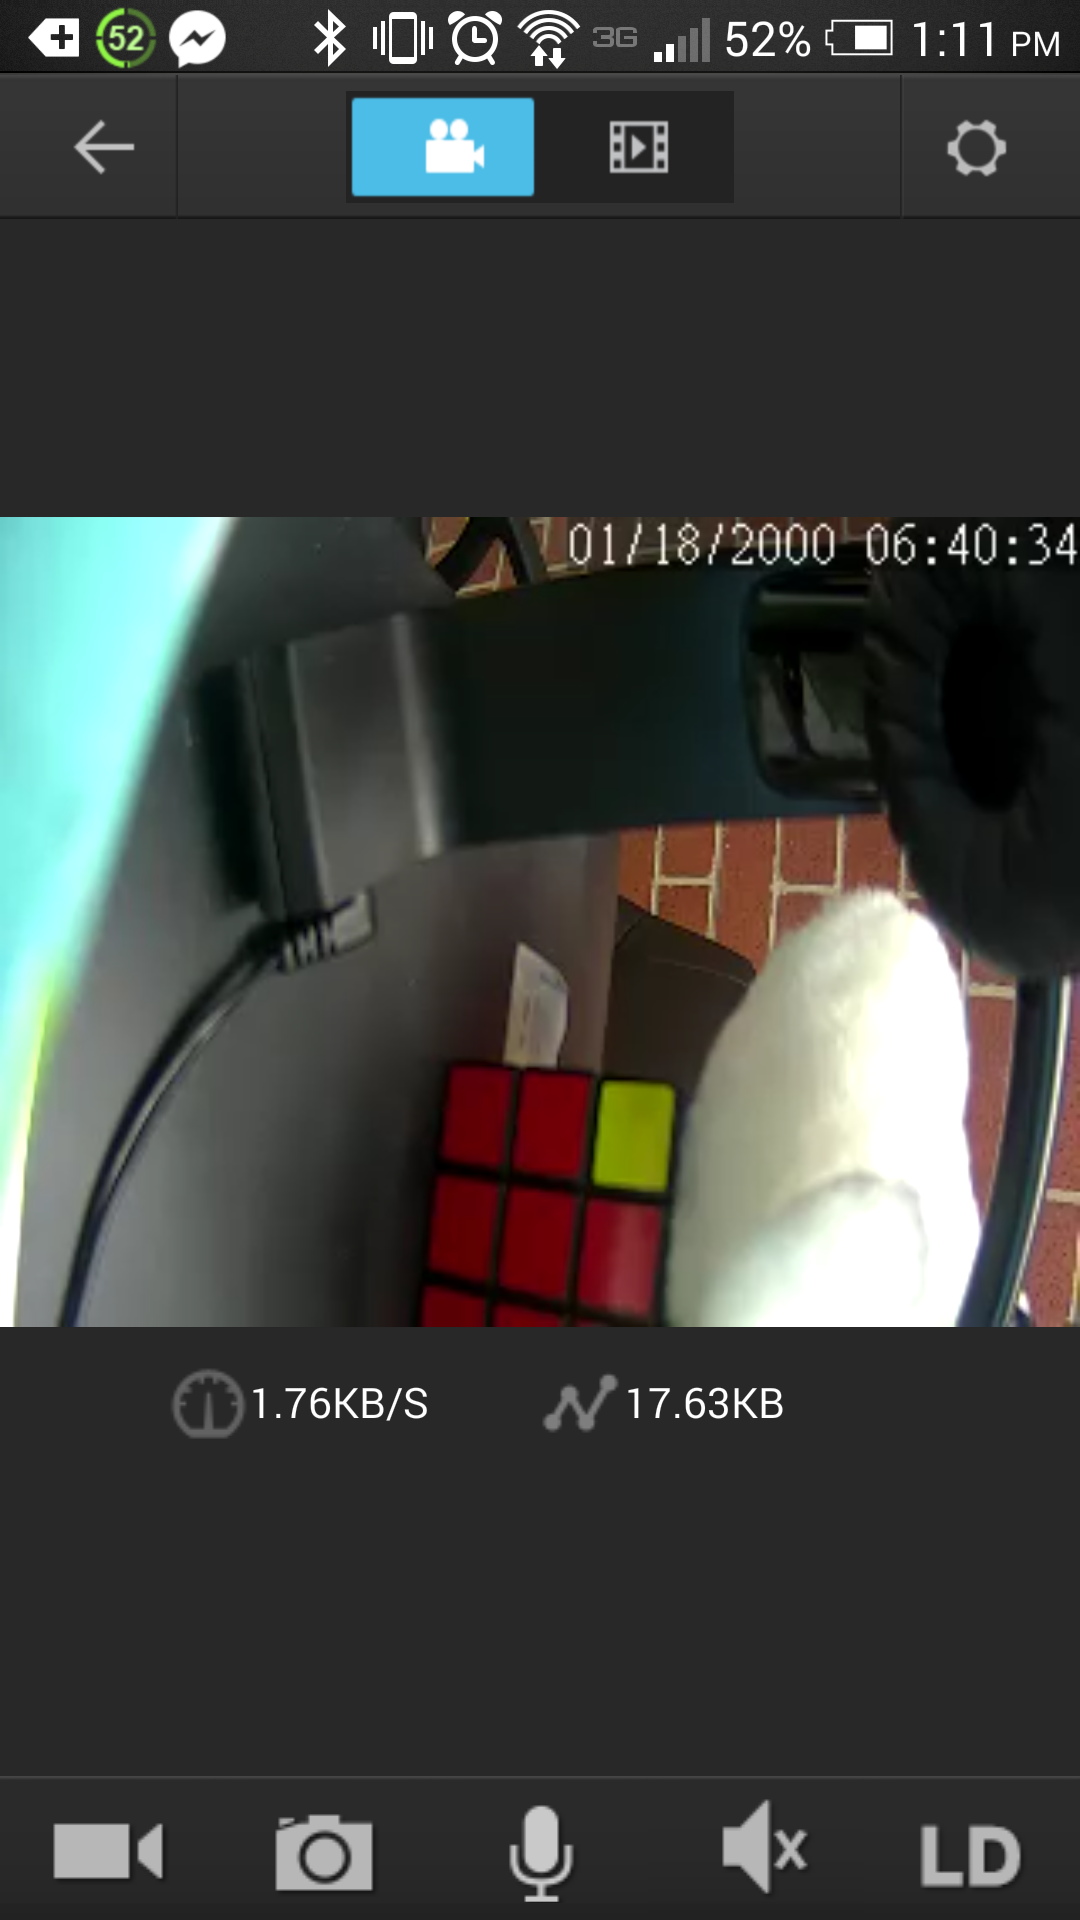
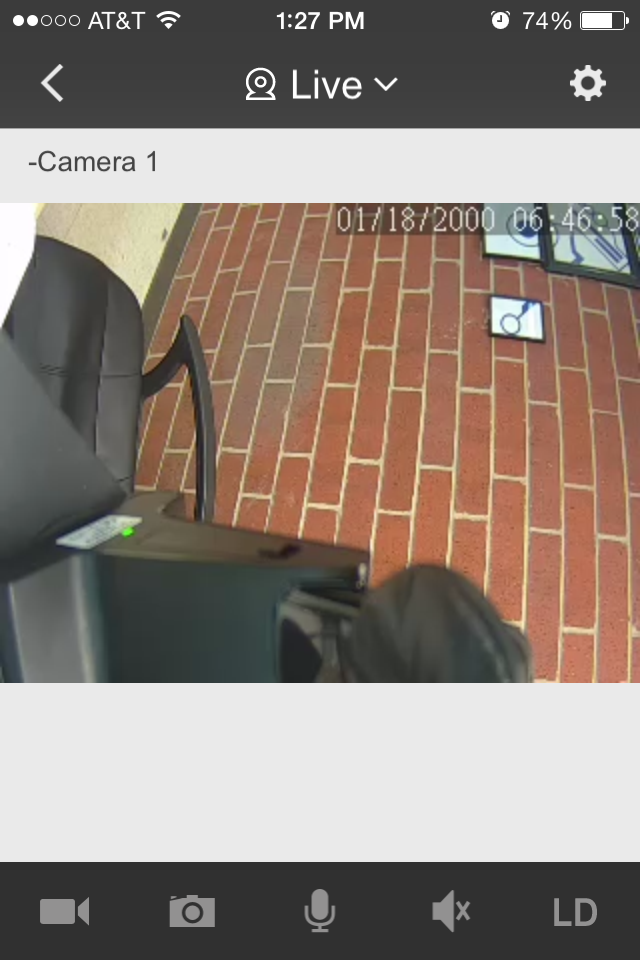
From the live image, tap on the gear icon to enter the camera settings.
Android iPhone
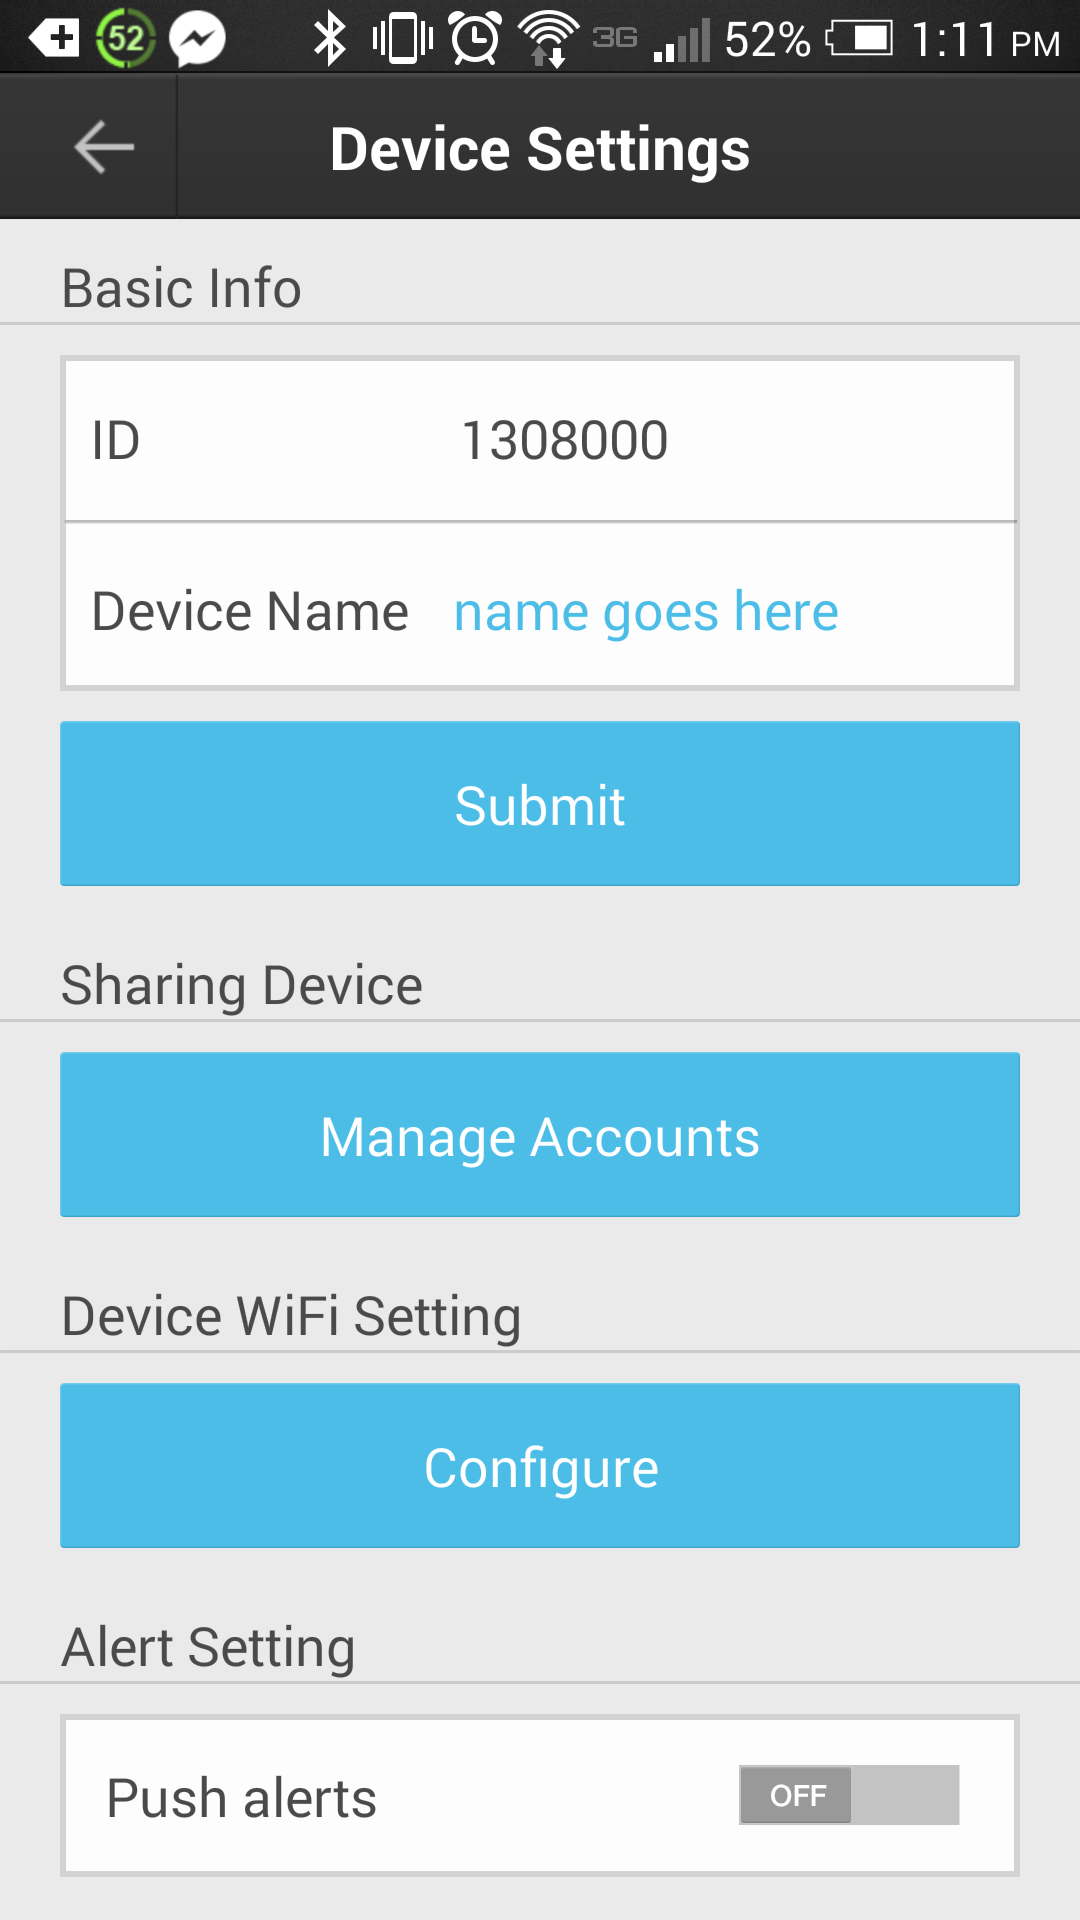
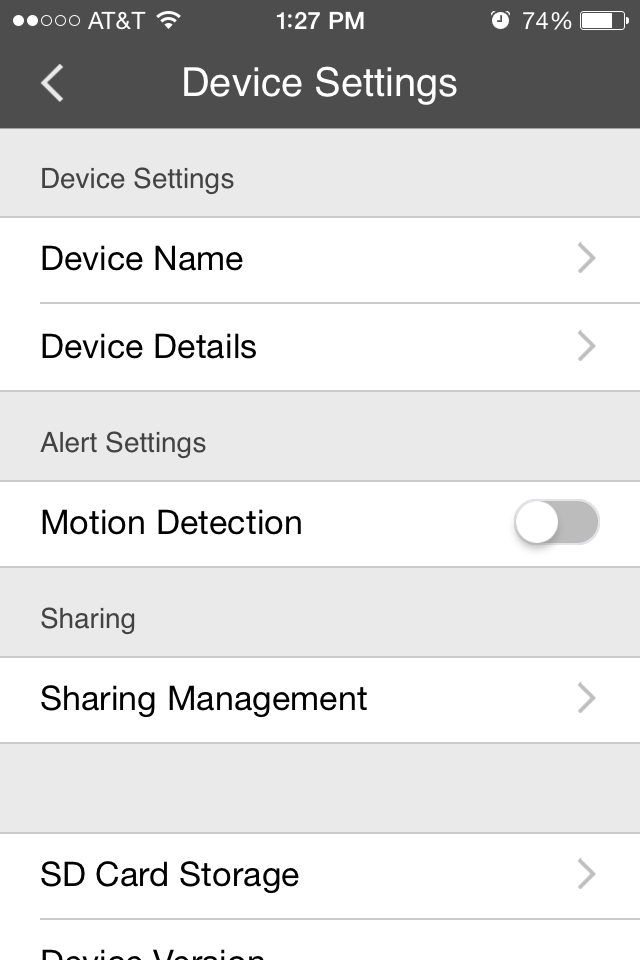
On an android tap the “configure” button under “Device WiFi Setting” for an iPhone tap “Device Details”
Android iPhone
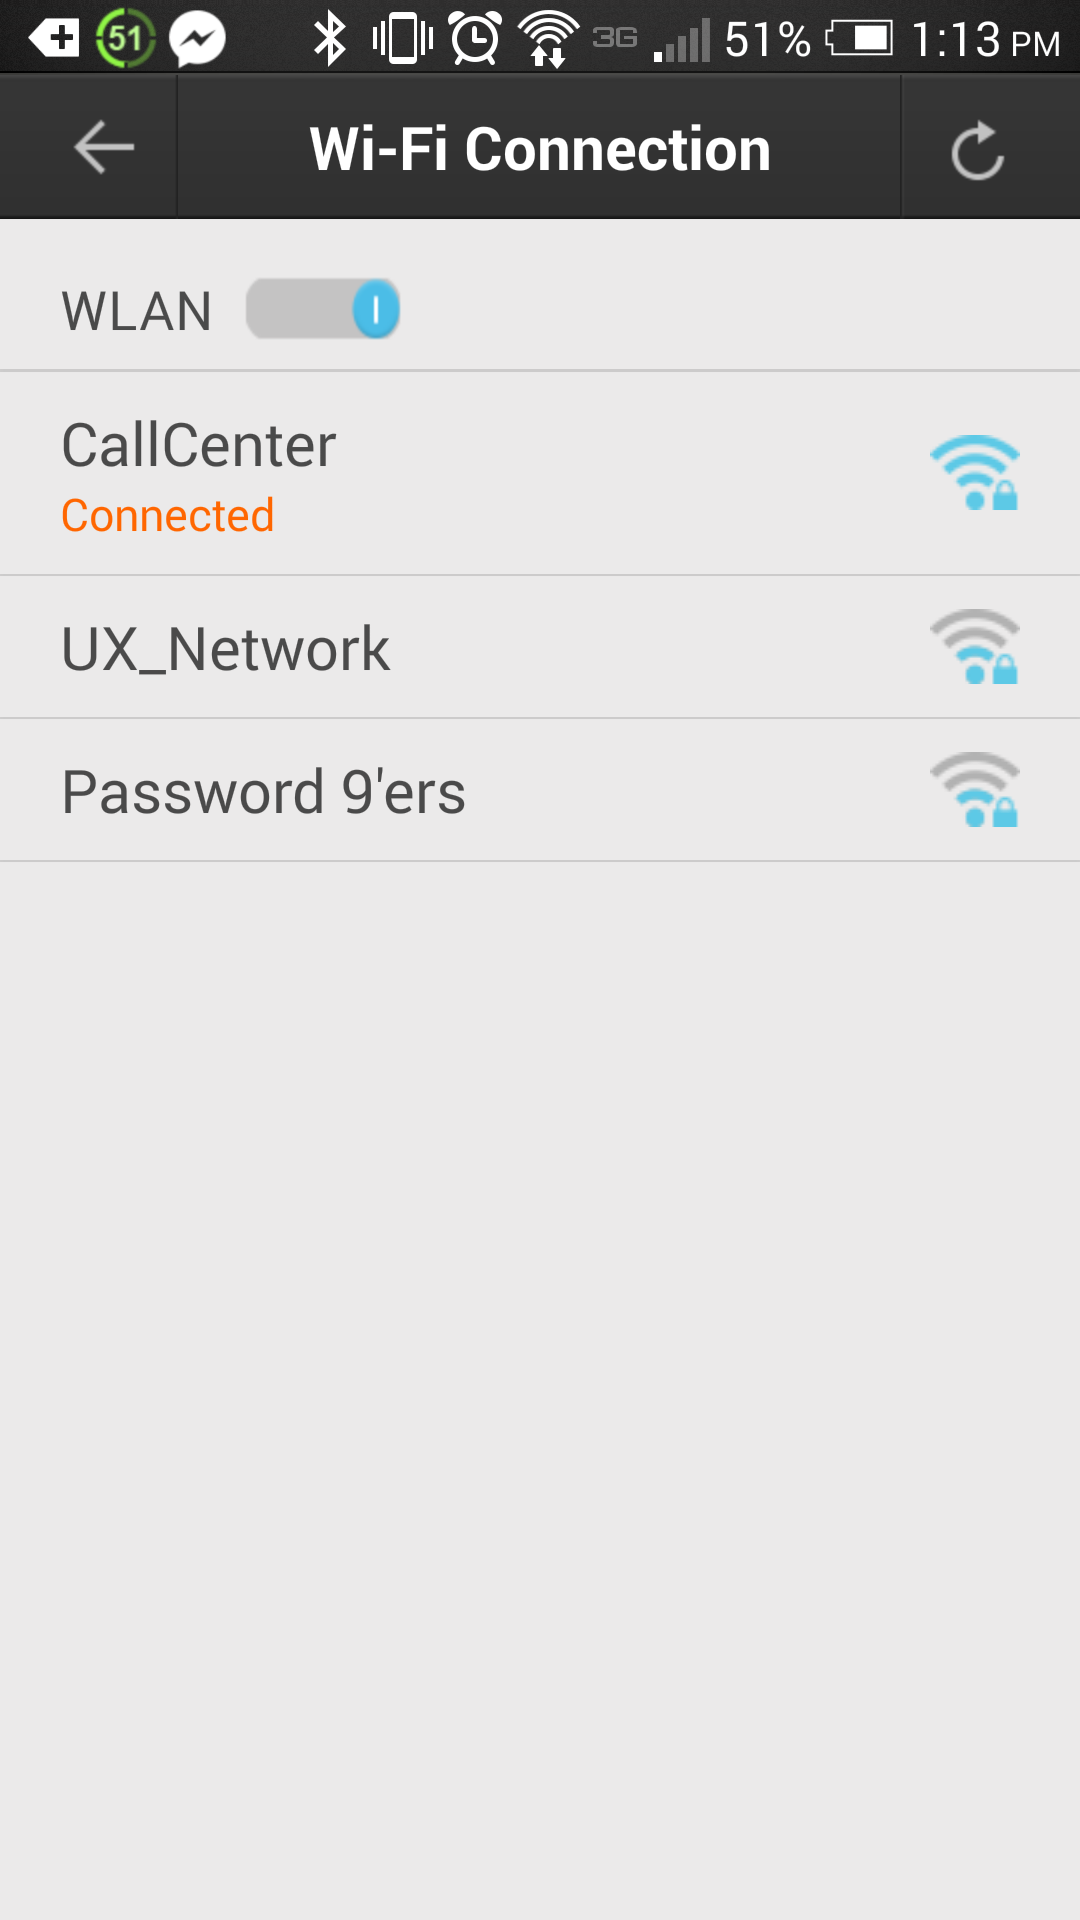

From there select your wireless network, and enter the correct WiFi password. After entering the WiFi password, you should see the word “connected” under the selected network.
At this point you can now disconnect the internet cable from the camera.
***After disconnecting the internet cable you will want to log completely out of the app, and then back in, and you will be able to view the camera wirelessly.***
↧
The Date on My DVR Always Reads 1-1-2000
If the date on the DVR always reads January 1st, 2000 even if you set the DVR to a different date, this indicates that the DVR has experienced an internal power surge which effects its ability to save settings correctly.
Unfortunately, there is currently no way to fix this issue. If your DVR experiences this problem, please contact Zmodo technical support so that we can replace the DVR under warranty.
↧
The ZSight App On My iPhone Will Not Let Me Connect
The latest ZSight update for iPhone and iPad devices created a bug with the connection to the Zmodo server that is preventing users from creating new accounts and sometimes accessing current ZSight accounts using ZSight.
Until the next iOS ZSight app update is approved by Apple, you can get around this issue by downloading the free mobile app called Meshare.
This Meshare app is the same as the ZSight app in most ways, you can create a new account and login to a current account. To access a current ZSight acount from the Meshare app, simply enter your ZSight login credentials into the Meshare app and login. You will be able to see all devices from the Meshare app that you've already added to your ZSight account using ZSight.
↧
↧
Some or All of the Cameras Do Not Appear on my DVR Screen
During the Hard Drive Installation process, it is possible to loosen or disconnect a bundle of internal cables that are responsible for communicating all cameras' video signals to the DVR screen.
If some or all of your cameras do not show on the DVR screen, please check the following:
1. Unplug your DVR from power and remove the top cover of the DVR.
2. Check the cable bundle in the image below. If this cable bundle is loose or disconnected from the main circuit panel in the DVR, reconnect this cable.
3. Replace the top cover of the DVR and power the DVR back on.
↧
Quick Guide for the ZM-AP630 Pan/Tilt/Zoom Camera
The ZM-AP630 is a Pan/Tilt/Zoom camera that connects to Analog DVRs using the standard RS-485 connection & BNC video connection.
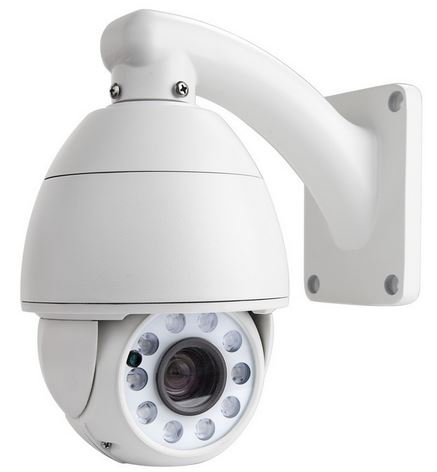
The RS-485 wires on the ZM-AP630 are blue and white. The White wire is Positive (+) and the Blue wire is Negative (-)
The default PTZ setting on each ZM-AP630 is set to Address 001, Baud Rate 2400, Pelco-D.
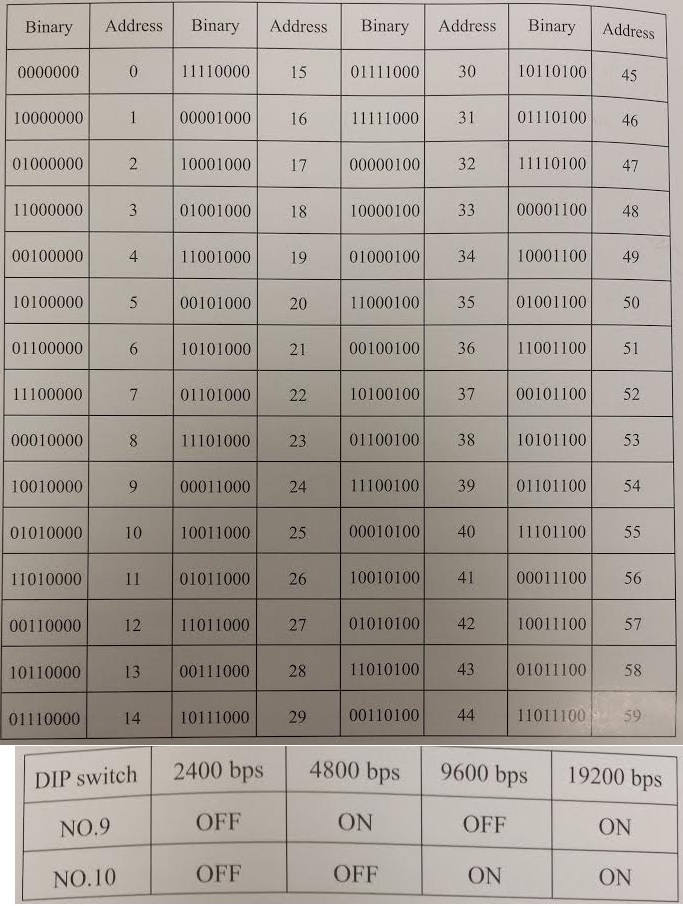
The dip switch settings on this camera ise dip switches 1-8 for the address and dip switches 9 & 10 for Baud Rate Settings. The following is the dip switch layout for the ZM-AP630:
↧
IP cam no wifi
In some cases the camera will pull a different IP in it's internal software as it is listed on 2 different tabs. You can correct this by finding the cameras IP address with the IPC search tool software (link below).
Open the software and search your network for your camera.
Once you see the camera listed, write down the IP address then right click on the camera listed and select "network".
Disable DHCP and set the IP address to match what you see on the IPC search tool for both network and wifi tabs.
Open Internet Explorer and access the camera by it's ip address. Be sure to enable compatibility view prior to logging in.
Click on the settings and check that the IP addresses match on the network and wifi tabs and then enter your wifi password for your network. You can then remove the ethernet cable from the camera as it will now be connected to your wifi.
http://files.zmodo.com/Software%20Files/NVR%20Tools/IPCSearch1.0.13_Setup.exe
↧